Hi there. I'm so glad you stopped by!
Today our Group of Seven Cardmakers is sharing a fun technique
that involved double embossing.
First we added VersaMark ink to the "high" side of an embossing folder before
dry embossing. I used 3D embossing folders but some in the group discovered that
regular embossing folders worked just as well.
Once the piece of mixed media paper was dry embossed, we sprinkled white embossing
powder over top and heat embossed the debossed side to make a resist.
(I think this would show better if the debossed parts weren't so small.)
Then we smooshed Distress inks on a craft sheet, spritzed with water and smooshed the
embossed piece into the ink. When we were happy with the colors, we dried
the piece and smooshed again with the same colors of Oxide ink.
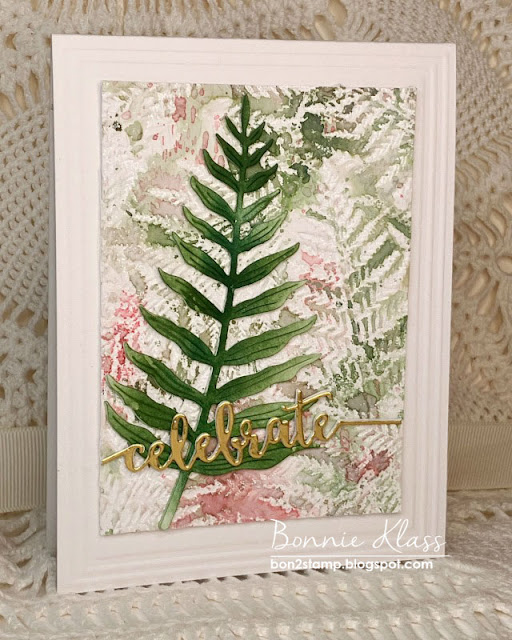
I made the mistake of die cutting my piece with a stitched rectangle die and
it kind of flattened the piece. So I carefully placed it back in the embossing folder
and embossed/debossed again. Fortunately it worked to give a deep embossing and
made the debossing stand out more.
I used a NBUS fern die cut from Neenah Solar White and inked with Distress ink and
added a sentiment cut from gold foil.
It's hard to stop at one....
This time I used a NBUS embossing folder and followed the same procedure.
I paired it with a die by Penny Black. It was cut from watercolor paper and
watercolored with Distress Markers and a waterbrush. I've stacked it 3 times for depth.
You can find a link to a video on this technique at the
The rest of the GO7 gals have some fabulous samples of this technique
at the site too! Do go visit all of them and see what worked for each and what didn't.
Thanks to Julia for leading the fun technique this month.
By the way, we've added a linky at the website so you can add any projects you do
using this technique. What a great resource for techniques!
Challenges:
Can You Handle the Pressure - Dry embossing Things with Wings
NBUS #47 - Never Before Used Schtuff (Tile Reflection EF)
Card Recipe (card 1)
Stamps:
Ink: VersaMark, Bundled Sage, Rustic Wilderness, Brushed Corduroy, Worn Lipstick (DI & DOX)
Paper: Mixed Media (Strathmore), Gold Foil
Other: Fern 3D EF (SU), White EP, Sword Fern Die (SSS), Sentimental Dies (Avery Elle)
Card Recipe (card 2)
Stamps:
Ink: VersaMark, Speckled Egg, Faded Jeans, Brushed Corduroy, Picked Raspberry (DI & DOX), Faded Jeans, Chipped Sapphire, Brushed Corduroy, Rustic Wilderness, Hickory Smoke (DM)
Paper: Mixed Media, Bashful Blue
Other: Tile Reflection 3D EF (Spl), White EP, Happy News Die (PB)
If you would like to subscribe by email,
please fill out the contact form in the upper right sidebar.
It is also important to add stampingwithklass1@gmail.com to your contact list
so Google recognizes the address and delivers the updates.
To unsubscribe please use the same form on the sidebar adding
unsubscribe to the message.
Thanks to all who have subscribed to my blog by email.
Your sweet and thoughtful comments warm my heart!


OMG.. Fabulously creative cards using the new Group of Seven Cardmakers monthly technique: Debossed Inky Resist!!!! Thank you Bonnie for sharing your detailed descriptions. Your choice of EB folders and DI's and DOX inks are Gorgeous. I am so excited to try the new technique:-) Wow!!!! Love and Hugs, Nancy P.S. Many thanks to Julia for the technique too:-)
ReplyDeleteYour cards are so creative and beautiful, Bonnie. LOVE this technique ... it was fun to do! Great tip about dry embossing your panel a second time after all your colouring and die-cutting was done. Happy to hear you had great success with your 3D folders ... not as much for me, but it could be their just weren't the right type of design. xx
ReplyDeleteI really love both of your folders used here Bonnie, the lovely colors used on each and the effectiveness of the technique! Well done doing a second embossing when die cutting it flattened it - (I've done that before! - the flattening I mean!) Julia xx
ReplyDeleteBeautiful examples Bonnie, sounds something even I could try.
ReplyDeleteI am loving all these examples, such cool backgrounds. I am going to have to give it a go xx
ReplyDeleteBoth gorgeous! Loving this little bit of pink behind the pretty fern! and all the neutrals you've used behind your lovely bird! Glad you couldn't stop at one, Bonnie!
ReplyDelete=]
Smooshing over embossing. My kind of technique. Your cards are fabulous, Bonnie,especially the bird. ;) I'll have to give this a try.
ReplyDeleteBeautiful cards and another fun technique to try. Thanks for the inspiration.
ReplyDeleteYou are the queen of brilliant bird designs, Bon, but it's your fern that made my jaw drop this time! I keep looking at it, enjoying every color nuance and detail! I love how fun this technique was and how beautiful all the cards are. Hugs, Dolly
ReplyDeleteLove the pinks and greens on the first one and the blue/grays on the second! These are both pretty, Bonnie!
ReplyDeleteWonderful cards! These are beautiful, artsy and soothing to the eye while still having a lot of beauty to look at
ReplyDeleteBoth are fabulous examples of the technique, Bonnie. Love the combination of colours on the first one. Wonderful watercolouring of the die cut on the second one.
ReplyDeleteGreat cards Bonnie...another technique to add to the 'to try'list! xx
ReplyDeleteLove this! What great texture and color so thank you for describing that technique. How fun this must be to do. Both cards are fantastic!
ReplyDeleteYour cards are both absolutely BEAUTIFUL Bonnie and I just LOVE the backgrounds and what you achieved with the embossing folders! I can see that I'm going to have to get my ef's out and give this technique a try! Lovely, lovely cards my friend!! Hugs. :0)
ReplyDeleteGreat technique and so beautiful on both cards! I love seeing all the different techniques you do. SO creative and talented!
ReplyDeleteLynn
OH MY STARS! What BEAUTIFUL creation! You are SO creative!!! Glad I don't have to choose a favorite! LOL Thanks so much for joining in the fun at our Can You Handle the Pressure challenge! Good Luck and we hope you’ll come back often.
ReplyDeleteDarlene
Can You Handle the Pressure
DAR’S CRAFTY CREATIONS
P.S. Did you hear the news? We have another new challenge blog we'd love to have you come check out and play along in. It all begins this Friday, March 3rd. It's called Triple B. Fun with Birds, Butterflies & Blooms. Would love to have you pop over! Appreciate your support!
Beautiful. Love the artsy look. Brilliant idea to run your flattened piece through the EF again!
ReplyDeleteBonnie, this is a technique with gorgeous results and you make me want to try it! The fern card is earthy and speaks to my love of ferns and woodlands. Pretty touches of color in with the greens. Then you have the gorgeous bird card with amazing background which could appear as either a screen or tile wall. I think you know how I love birds, too. Not surprised you couldn't stop at one. Wow!
ReplyDeleteI am excitedd about your lovely card. What a great creation!
ReplyDeleteLia DT CYHTP
The fern card is beautiful. That is a great idea to emboss/deboss again. I love the embossing folder on the bird card, plus the colors. Great watercoloring on the bird.
ReplyDeleteWow! I love the fern and am amazed that you were able to emboss the piece again - how did you get it to fit in the same place?! Then I scrolled down and saw the bird card and it is such a showstopper! Bravo Bonnie! Vicky x
ReplyDeleteThe alcohol inked bauble gives the effect of it spinning on the tree! Wonderful! Vicky x
ReplyDeleteBoth cards are so beautiful, Bonnie! I especially love the unique debossed inky resist backgrounds! The pink and green ink combo of the first card is so pretty, and I love the darling blue bird of the second card. Thanks so much for your inspiration, as always!
ReplyDeleteHideko xx
Beautiful cards Bonnie, this was a fun technique and I especially love your little bird on a branch with the blues and brown and your tile EF ♥
ReplyDeleteWow! What gorgeous cards Bonnie! I love the look of this technique you have gotten here with these two cards. Can't wait to go over to see the rest of the group's cards as well. Very cool look indeed! Hugs, Brenda
ReplyDeleteBoth cards are lovely. The bird and branch are a great pairing with your embossed panel.
ReplyDelete