Showing posts with label Stencil. Show all posts

Monday, April 28, 2025

Stencil Happy

Hi there.  I'm so glad you stopped by!

Seeing a couple of stencil challenges, I thought it was high time to put
some of that stash of stencils to use.


I wanted to go bright and happy.  I think I succeeded.

I used the sketch at CAS Colours & Sketches.  I hope this is CAS enough.  

Using a stencil and sketch took me out of my comfort zone.

It was fun!

Challenges:
CAS Colours & Sketches #558 - (see sketch below)
Darnell's I.D.E.A.S. - Anything Goes Week
Just Us Girls #772 - Stencil Week


Card Recipe
Stamps: BP Cheers to You Sentiments (SB) 
Ink:   BP Black (SB), Scattered Straw, Mustard Seed, Vintage Photo, Shabby Shutters, Mowed Lawn, Abandoned Coral (DI)
Paper:   Neenah Solar White Pattern Paper (DB)
Other:  Fading Florals Stencil (SSS), Caran d'ache Supracolor Pencils (Naples Yellow, Dk Carmine, Sepia)


Enjoy!


If you would like to subscribe by email,
please fill out the contact form in the upper right sidebar.
It is also important to add stampingwithklass1@gmail.com to your contact list
so Google recognizes the address and delivers the updates.

To unsubscribe please use the same form on the sidebar adding
unsubscribe to the message.

Thanks to all who have subscribed to my blog by email.
Your sweet and thoughtful comments warm my heart!

Friday, March 28, 2025

Embossing Paste Play

Hi there.  I'm so glad you stopped by!

This month the Group of Seven Cardmakers made cards using embossing paste.


I chose this stencil that has two branches on it and white embossing paste.
I put a drop of Mint Macaroon re-inker on my craft mat and mixed some embossing
paste into it until the color was smooth and even.

Using a palette knife, I added the paste through the stencil and when it was covered
good, I scraped it smooth with the same knife.

I used the larger branch for this first card and made it into a Dogwood tree.
Our dogwoods are blooming now and so pretty!

The leaves weren't quite dark enough, so I replaced the stencil after the paste
was dry and sponged some darker green ink on the base of the leaves.


The second card was done using the smaller branch and I got some smudges of
embossing paste where they didn't belong.

The wings of this butterfly covered the smudges very well.  It was cut from
a piece of silver sparkle specialty paper that had alcohol ink dripped on top and 
moved around with a puffer.

Smaller flowers made this into a cherry tree or some kind of blooming tree.

I've learned to clean the stencil as soon as I finish with the paste.  I keep a dish of
water in the studio to drop the stencil in when I'm finished.  When I'm ready to take
it to the sink, the paste hasn't hardened on the stencil. And it's very easy to add color
to the paste with re-inkers.

The Group of Seven blogsite has some step by step instructions and a linky.
If you'd like to try this you can add your card and let us know how it worked
for you.


Challenges:
Just Us Girls #768 - ATG using a stencil
Stencil Fun - ATG using a stencil (Option of splatters. I have stamped splatters on card 1)
The Neglected Stuff - Dogwood die hasn't been used in at least a year


Card Recipe (card 1)
Stamps:  Just Sentiments - Easter (PTI), Splatters (?)
Ink:   Picked Rasperry, Aged Mahogany, Rustic Wilderness (DI)
Paper:   Neenah Solar White, Shimmer
Other:  Mint Macaroon re-inker, Embossing Paste (Wendy Vecchi), Slimline Gentle Leaves Stencil (TCW), Ribbit Prills, Dogwood Die (Elizabeth Crafts)

Card Recipe (card 2)
Stamps:  Easter Blossoms (ret SU)
Ink:   Versafine Onyx Black, Primrose Petals
Paper:  Neenah Solar White, Pink Pirouette (SU), Silver Sparkle (TH) 
Other:  Slimline Gentle Leaves, Embossing Paste (WV), Potpourri Flower Set (PS), Dreamy Butterfly (MB), Alcohol Ink
Enjoy!


If you would like to subscribe by email,
please fill out the contact form in the upper right sidebar.
It is also important to add stampingwithklass1@gmail.com to your contact list
so Google recognizes the address and delivers the updates.

To unsubscribe please use the same form on the sidebar adding
unsubscribe to the message.

Thanks to all who have subscribed to my blog by email.
Your sweet and thoughtful comments warm my heart!

Sunday, September 29, 2024

Leaves

Hi there.  I'm so glad you stopped by!

Our craft group used stencils this month.


We stenciled on black cardstock with white pigment ink.

After drying the ink, we daubed some colored pigment ink over the white ink.

I went over the leaves randomly with my embossing marker and added some gold
embossing.  The die cut leaf was in the envelope with the die.  I really don't remember
how I did that, but it went well with the background.

Since there was still time to play, I used the leaf stencil that I'd taken.


I was having trouble getting good coverage with the white ink and since I was using
my leaves stencil, the next day I stenciled again and got better coverage.

It seems I have gold embossing on the brain, because I decided to emboss these leaves
while the ink was still mostly wet.

I die cut leaves with a matching die using some cardstock I'd sponged earlier and
added some splatters with gold re-inker.

Challenges: (card 1)
Double D - Fall Leaves
Just Us Girls #746 -  ATG using a stencil

Challenges: (card 2)
Seize the Birthday #292 - Use the word Celebrate


Card Recipe (card 1)
Stamps:  
Ink:   Pigment Inks (White & various)
Paper:   Black, Foil Cardstock
Other:  Leaf Stencil (?), Caran d'ache Supracolor Pencils, Embossing Marker, Gold EP, Large Stitched Maple Leaf die (SSS), Fancy Hello die (Alt)

Card Recipe (card 2)
Stamps:  
Ink:   Whisper White, Crushed Curry, Pumpkin Pie, Tangerine Tango, Cajun Craze (for sponging)
Paper:   Black, So Saffron
Other: Gold EP, Leaves Stencil (SSS), Clustered Leaves die (SSS), Sweet Sentiments die (Alt), Encore Gold re-inker (for splatter)


Enjoy!


If you would like to subscribe by email,
please fill out the contact form in the upper right sidebar.
It is also important to add stampingwithklass1@gmail.com to your contact list
so Google recognizes the address and delivers the updates.

To unsubscribe please use the same form on the sidebar adding
unsubscribe to the message.

Thanks to all who have subscribed to my blog by email.
Your sweet and thoughtful comments warm my heart!

Thursday, August 22, 2024

Sending Caring Thoughts for Just Us Girls

Hi there.  I'm so glad you stopped by!

It's my final week Guest Designing at Just Us Girls.
Thank you for the opportunity and warm welcome from this fantastic Design Team.
It's been such a pleasure!

This week the challenge is...


This background was made using Leafy Green Paper Glaze through a stencil.
It has a wonderful shine to it! 

A couple of dragonflies cut from an alcohol inked piece and a snippet of vellum
and this design was done.

A BIG thankyou to Just Us Girls for the warm welcome!

Challenges:
Just Us Girls - Stencil Week
Stencil Fun - Use a stencil


Card Recipe
Stamps:  Bamboo Beauty (SU)
Ink:   Blueberry Bushel
Paper:   Neenah Solar White, Vellum, Glossy, Gold Foil
Other:  Bamboo Stencil (Magenta), Picket Fence Paper Glaze,(Leafy Green), Etched Dragonfly Die (SSS), 


Enjoy!


If you would like to subscribe by email,
please fill out the contact form in the upper right sidebar.
It is also important to add stampingwithklass1@gmail.com to your contact list
so Google recognizes the address and delivers the updates.

To unsubscribe please use the same form on the sidebar adding
unsubscribe to the message.

Thanks to all who have subscribed to my blog by email.
Your sweet and thoughtful comments warm my heart!

Wednesday, February 28, 2024

Masked Stenciling for Group of Seven Cardmakers

Hi there.  I'm so glad you stopped by!

Our Group of Seven cards this month use stencils and masks.


We used die cuts or torn paper under a stencil to mask off to make a
unique shape to the image.

I wanted to use some NBUS layering stencils that I had bought last year.
I'm not sure they were the best choice for this technique.

I die cut a scalloped curve for the first card.  If you look close you can see
the scallops.  They were invisible until I sponged around the flowers.

I need lots more practice on adding ink with a sponge or brush!
Some touch up with watercolor pencils helped with the detailing.

The dots are tiny black rhinestones.


I die cut with a bracket edge die to mask on the second card.  The flowers went over the
edge of the mask which made the shape show a little better.

After adding detail with watercolor pencils, I splattered with white gouache.
(I'm living dangerously!)  Fortunately I didn't ruin the whole thing.

The sentiment was heat embossed on a scrap of mixed media paper and
I sponged some of the purple ink over top.

I hope you go over to the Group of Seven Cardmakers Blog
and check out what my friends have done. You won't be sorry that you did.
And if you want to try this technique, there is a linky over there so you can
add to the gallery.

Challenges:
Group of Seven Cardmakers - Masked Stenciling
NBUS #59 - Never Before Used Schtuff (both stencils)


Card Recipe (card 1)
Stamps:  Agapanthus (ret TT)
Ink:   Lilac, Guava, Lemonade, Sunshine, Amethyst, Sprout (SSS), Tumbled Glass (DI)
Paper:   Neenah Solar Shite, Black
Other:  Scalloped Borders 2 Die (PPP), Layering Cosmos Stencil (SSS), Black gems (?), Caran d'ache Supracolor Pencils


Card Recipe (card 2)
Stamps:  All Occasions (Jane's Doodles)
Ink:   Victorian Velvet, Wilted Violet, Shabby Shutters, Rustic Wilderness (DI)
Paper:   Mixed Media, Strathmore, Fresh Freesia (SU)
Other:  A2 Bracket Borders (Spl), Fragrant Florals Stencils (Alt), Caran d'ache Supracolor Pencils, White Gouache, White EP


Enjoy!


If you would like to subscribe by email,
please fill out the contact form in the upper right sidebar.
It is also important to add stampingwithklass1@gmail.com to your contact list
so Google recognizes the address and delivers the updates.

To unsubscribe please use the same form on the sidebar adding
unsubscribe to the message.

Thanks to all who have subscribed to my blog by email.
Your sweet and thoughtful comments warm my heart!

Saturday, October 28, 2023

CAS for JUGS

Hi there.  I'm so glad you stopped by!

It's my final week Guest Designing with the Just Us Girls Challenge.  It has been such fun 
joining in with this lovely group that has welcomed me so warmly.  
Thank you for the opportunity to join your fabulous Design Team this month.


The challenge this week is....

I apologize to those who don't like spiders.  But this guy is so cute! 
He's not scary at all!

He's hanging in the middle of the card and needed something to help him
stand out.  I had a new pumpkin die set and used it to cut a stencil of the outline.

After ink blending some orange ink through the stencil, I used the dies that are
for cutting layers for the pumpkin to trace around with a colored pencil to
give the pumpkin some dimension.

I hope you'll go to the JUGS website and see what the Design Team has done
to inspire you.  Once inspired, use the center of your card to make something to
share over there.

Challenges:
Just Us Girls - Use Just the Center of Your Card (remember to keep it CAS)
Double D - Pumpkins
NBUS #55  -  Never Before Used Schtuff (Pumpkin Die)
Simply Clean And Simple -  Option Autumn 
Stencil Fun - Use a Stencil - Using Option of ORANGE


Card Recipe
Stamps:  August Limited Edition (Unity)
Ink:   Memento Tuxedo Black, Carved Pumpkin, Ripe Persimmon, Vintage Photo (DI)
Paper:   Neenah Solar White, Vellum (For stencil)
Other:  Copics (V05, V04), Into the Blooms-Pumpkins (PTI), Caran d'ache Supracolor Pencils (Orange, VanDyke Brown), Crystal Glaze, Wonky Stitched Rectangle Die (MFT)


Enjoy!


If you would like to subscribe by email,
please fill out the contact form in the upper right sidebar.
It is also important to add stampingwithklass1@gmail.com to your contact list
so Google recognizes the address and delivers the updates.

To unsubscribe please use the same form on the sidebar adding
unsubscribe to the message.

Thanks to all who have subscribed to my blog by email.
Your sweet and thoughtful comments warm my heart!


Saturday, January 21, 2023

Christmas Ornaments

Hi there.  I'm so glad you stopped by!

Playing with a special stencil...


I used tape to block off areas that I didn't want inked (I'm very messy with my inking)
and did one color bow at a time.  I did the same thing for the ornaments.

The gold ornaments were inked with Encore Gold ink and heat embossed.
I added VersaMark through the stencil on the red ornament and bows.  Then I heat 
embossed them with clear powder to get the shine.

The greenery was sponged through a stencil made with a die.

The design was matted on a piece of matte gold foil leaving a thin frame
then placed on a piece of embossed cardstock.

This is a large stencil so my card is an A7 sized.

Challenges:
Christmas Kickstart #70 - Use a Stencil or Mask
Crazy is Our Fame Stencils is Our Game - ATG with stencil/option of Winter


Card Recipe
Stamps:  
Ink:   Lumberjack Plaid, Bundled Sage, Rustic Wilderness (DI), Encore Gold, VersaMark
Paper:   Neenah Solar White, Gold Foil
Other:  Damask Bauble Bow Stencil (Sweet Poppy), Pretty Pines Thinlits Die (ret SU), Gold EP, Clear EP, Forever Green EF (Spl)


Enjoy!


If you would like to subscribe by email,
please fill out the contact form in the upper right sidebar.
It is also important to add stampingwithklass1@gmail.com to your contact list
so Google recognizes the address and delivers the updates.

To unsubscribe please use the same form on the sidebar adding
unsubscribe to the message.

Thanks to all who have subscribed to my blog by email.
Your sweet and thoughtful comments warm my heart!

Thursday, September 15, 2022

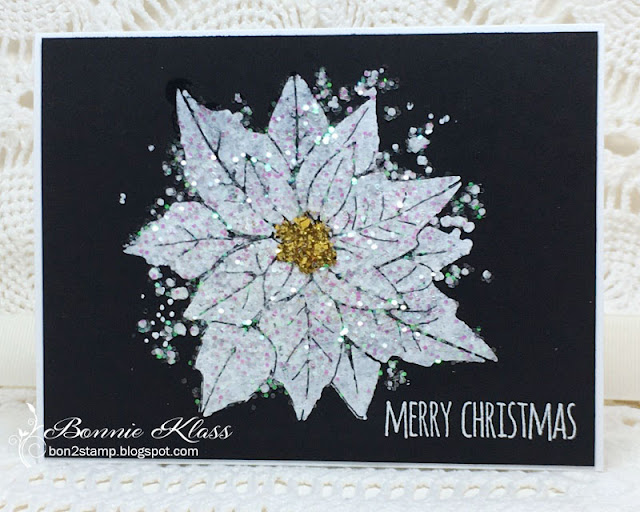
Sparkly Poinsettia

Hi there.  I'm so glad you stopped by!

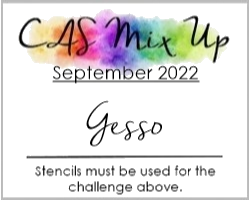
There's still time to join in at CAS Mix Up.


Hilary is hosting the challenge and she's asking for us to use Gesso with a stencil
on our CAS cards.


I used a Time Holtz stencil and applied Gesso through it onto a piece of
heavy black cardstock.

It's best to use a light hand with the Gesso and build it up slowly.
Unfortunately I didn't realize that at the time and had some oozing under
the stencil that made for a messy look.

While doing this during a Zoom session, Christine suggested using a
black marker to "clean it up".  It worked really well!
Thanks Christine.

I decided to leave this white instead of coloring over the Gesso and went
for sparkle instead.

I replaced the stencil and sponged some glue over the petals, removed the stencil,
 then sprinkled some white glitter over top.  I replaced the stencil and daubed some glue
over the center, removed the stencil and sprinkled gold glitter.

The sentiment has been stamped and heat embossed.

I'm still finding glitter in the studio!

Check out what the rest of the Design team has done and
I hope you'll join us at CAS Mix Up.

Challenges:
CAS Mix Up - Stencil using Gesso
CAS Christmas - Sparkle and/or Shine
Flower Challenge - Add Sparkle (Flower must be main image)
NBUS - Never Before Used Schtuff (Stencil)


Card Recipe
Stamps:  Scribbly Christmas (TH)
Ink:   Whisper White
Paper:   Black Licorice (MFT)
Other:  Gesso, Glitter


Enjoy!


If you would like to subscribe by email,
please fill out the contact form in the upper right sidebar.
It is also important to add stampingwithklass1@gmail.com to your contact list
so Google recognizes the address and delivers the updates.

To unsubscribe please use the same form on the sidebar adding
unsubscribe to the message.

Thanks to all who have subscribed to my blog by email.
Your sweet and thoughtful comments warm my heart!