Showing posts with label Gilding Flakes. Show all posts

Monday, April 28, 2025

Gilding Flakes with Group of Seven Cardmakers

Hi there.  I'm so glad you stopped by!

This month the Group of Seven Cardmakers are focusing on gilding flakes on acetate.


Gilding flakes are not my favorite.  But this time I got better results than I usually do.  I think
it may be because I used my fingers to rub off the excess flakes instead of the scrubby thing.
It does have a nice shine to it.

I inked the stamp with some Flitter Glue and stamped it on a piece of acetate.
It's important to wash the glue off immediately.  I hope I got it all off.  I used a
toothbrush to get into the crannies.

The glue stays tacky so there isn't a big rush to get the gilding flakes on it.

My pot has some quite large flakes in it so I was able to cover the glue quickly.
When it was covered with flakes, I used my fingers to rub off the excess and a 
Swifter to get the excess off the acetate.

Both sides look nice and in the video, it shows putting it over an aperture.
Instead I framed it and used foam tape to elevate it over a background piece
from my stash that was a Brusho mop up.  I should have done the aperture 
because the foam tape has made it too thick to mail.

A word of warning when using gilding flakes.  Don't have a fan going in the room!
And have a vacuum handy!  Oh, and Brenda says not to cough.  I imagine sneezing
could cause all kinds of flakey fall out too.

There's a video on the Group of Seven post and my teamies have some 
much better examples to inspire you.  There's a linky there too, if you want
to try gilding flakes on acetate and show us what you do.


Card Recipe
Stamps:  Soft Wings (PB)
Ink:   
Paper:   Neenah Solar White, Acetate, Mixed Media
Other:  FlitterGlu (IndigoBlu), Gold Gilding Flakes ($ store), Stitched Rectangle & A2 Thin Frames dies (SSS), Burlap EF (HB)


Enjoy!


If you would like to subscribe by email,
please fill out the contact form in the upper right sidebar.
It is also important to add stampingwithklass1@gmail.com to your contact list
so Google recognizes the address and delivers the updates.

To unsubscribe please use the same form on the sidebar adding
unsubscribe to the message.

Thanks to all who have subscribed to my blog by email.
Your sweet and thoughtful comments warm my heart!

Sunday, January 28, 2024

Alcohol Ink with Gilding Flakes for GO7

Hi there.  I'm so glad you stopped by!

This month the Group of Seven Cardmakers had a messy play with alcohol inks and
Gilding Flakes.

I did four cards from two pieces of gilded alcohol ink.

First up....


For the blue piece, I used lots of alcohol with the ink on Yupo paper and my 
Tim Holtz Ink Blower to move the colors in fun patterns. I let it dry completely and
tried to add gilding flakes to the sticky areas.  

I couldn't get it to stick, so I used the skinny tip
of my Bearly Arts glue and added thin beads of glue to some areas then covered the glue with the
gilding flakes and let it sit for a while before rubbing the excess flakes off. 

I die cut some 
feathers from it.  You can't see it in the photo, but there are dry embossed 
feathers in the background.

 With the rest of the piece, I CASEd myself...  


I hadn't used this fun die in a long time and it works so well with
alcohol inked backgrounds.

Then I did a piece of green and made two more cards.

My first Christmas card of the New Year...


Again I used lots of alcohol with the ink on Yupo paper and my Tim Holtz Ink Blower to move
the color around.  Before the piece was completely dry, I covered it with gilding flakes
and pressed into the ink.  I left it to dry a bit then I used a scrubby to rub off the excess.

There was still some sticky places after it dried and I couldn't get the flakes to stick
so I sprinkled baby powder over the top and rubbed off with a dry baby wipe.
This worked great to get the sticky off.

For my final card, I used the rest of the green piece...


and added an Irish Blessing and hot foiled butterfly to it.
The butterfly was hot foiled on acetate and put on top of a die cut
of plain white.  The antenna is from gold cardstock.

Do go over to the Group of Seven website and check out the instructive videos and 
the beautiful examples the rest of the GO7 gals have done.  They have good tips and tricks
for this technique on their blogs.  If you try it yourself, you can link up your results
over there too.  The biggest tip I have is to wait until AFTER you do this to vacuum!


Challenges:
Group of Seven Cardmakers - Alcohol Ink with Gilding Flakes
Double D Challenge - Sparkle and/or Shine
Try it on Tuesday - Add Some Text


Card Recipe (card 1)
Stamps:  Encouraging Words (Stampendous)
Ink:   VersaMark, Aqua, Monsoon AI (Ranger)
Paper:   Yupo, Black, Gold Foil
Other:  Feathers on the Side EF (Darice), Feather Dies (?), Gold Gilding Flakes ($ Tree), Gold EP, Circle Punches (1/8" & 1/4")

Card Recipe (card 2)
Stamps:  Sentiment Strips (Alt)
Ink:  Midnight Muse, Aqua, Monsoon AI (Ranger)
Paper:   Yupo, Neenah Solar White
Other:   Floral Stem Collage (PS), Gold Gilding Flakes ($ Tree)

Card Recipe (card 3)
Stamps:  Holiday Sayings (Inky Antice)
Ink:   Gumball Green, Citrus, Limeade, Botanical AI (Ranger)
Paper:   Yupo, Neenah Solar White, Gold Foil
Other: Gold Gilding Flakes ($ Tree), Pretty Pines Thinlits (ret SU), Quickie Glue Pen, Glitter,

Card Recipe
Stamps:  Irish Blessing (Verses)
Ink:   Versafine Onyx Black
Paper:   Yupo, Neenah Solar White, Acetate
Other: Gold Gilding Flakes ($ Tree), Mini Slimline Double Stitch Die (KS), Small Butterflies Hot Foil Plate & Die, (PFS), Gold Foil

Enjoy!


If you would like to subscribe by email,
please fill out the contact form in the upper right sidebar.
It is also important to add stampingwithklass1@gmail.com to your contact list
so Google recognizes the address and delivers the updates.

To unsubscribe please use the same form on the sidebar adding
unsubscribe to the message.

Thanks to all who have subscribed to my blog by email.
Your sweet and thoughtful comments warm my heart!

Thursday, March 30, 2023

More Dry Embossed Gilding

Hi there.  I'm so glad you stopped by!

I have some more gilding and embossing from our 


During our Zoom session, Julia pointed out that her pieces felt sticky.
Mine did too. So I had the brilliant idea to put embossing powder over it and heat
emboss.  It got rid of the sticky, but also covered up a lot of the variegation in the
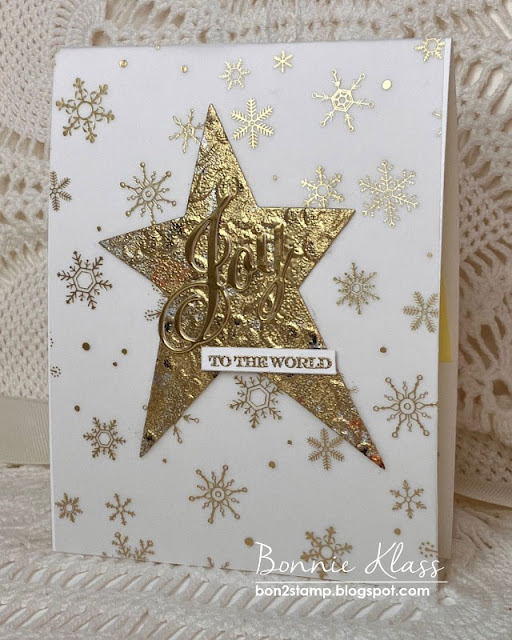
gilding flakes.  It was usable though and made a lovely Christmas card.

Here's a sample of what the piece looked like before gold embossing powder.


This time I used clear embossing powder.  It left the variegation in color and got rid
of the stickiness.

Have you tried this technique yet?
Directions and link up at

Challenges:
ABC Christmas - E for elves, F for food, or G for gold
Rudolph Days - ATG Christmas


Card Recipe (card 1)
Stamps:  Holiday Snippets (PB)
Ink:   Encore Gold, Jet Black Stazon (for technique)
Paper:   Neenah Solar White, Printed Vellum (ret SU), Gold Foil
Other:  Gilding Flakes (Eton Mess, Chariot of Fire/Indigo Blu), Dazzling Star Die (Gemini), Greetings Die (PB), Gold EP

Card Recipe (card 2)
Stamps:  Easy Expressions Original (Ton)
Ink:   Versafine Onyx Black, Jet Black Stazon (for technique)
Paper:   Neenah Natural, Naturals Ivory (ret SU)
Other:  Elodee Bird Background Die (MB), Stitched Rectangle Die (SSS), Tall Pines 3D EF (SSS)


Enjoy!


If you would like to subscribe by email,
please fill out the contact form in the upper right sidebar.
It is also important to add stampingwithklass1@gmail.com to your contact list
so Google recognizes the address and delivers the updates.

To unsubscribe please use the same form on the sidebar adding
unsubscribe to the message.

Thanks to all who have subscribed to my blog by email.
Your sweet and thoughtful comments warm my heart!

Tuesday, March 28, 2023

Dry Embossed Gilding Flakes for Group of Seven Cardmakers

Hi there.  I'm so glad you stopped by!

This month's Zoom with the Group of Seven Cardmakers was messy but
gave fabulous results.


There are instructions and a video link at the GOSC site along with some of the
cards the group has done using this technique.

The first step is to add some sticky sheet to a piece of cardstock and press
gilding flakes into all the sticky and burnish it.  I used a scrubby pad that came with
the Indigo Blu gilding set I bought several  years ago.

After dry embossing it, we swiped with black permanent ink.
The other gals got much better results with the ink.  I'm thinking my inkpads
may need some refreshing.

I cut my piece to get two cards. Here is the second...


You can put two gilded pieces in the embossing folder back to back so you
get an embossed and a debossed side.  I got a picture of both before I put them on cards.


This shows the debossed side better. 
Or is it the embossed side?


I hope you'll check out the website and the other Group of Seven Cardmakers cards.
It's always interesting to hear what tips and tricks the others have found
in the process of doing this technique.

If you try this technique we'd love for you to link it at the site so we will be sure to
see what you did and hear how it worked for you.


Card Recipe (card 1)
Stamps:  Sentiment Strips (Alt)
Ink:   Black Stazon, Encore Gold
Paper:   Neenah Solar White, Gold Foil, Black, Vellum
Other:  Indigo Blu Gilding Flakes (Chariot of Fire, Eton Mess), Sticky Sheet (Sizzix), Vintage Wallpaper EF (ret SU), Drifting Side Butterfly (MB), Wildflower Die (TH), Gold EP

Card Recipe (card 2)
Stamps:  
Ink:   
Paper:  Neenah Solar White, Gold Foil, Black, Vellum
Other:  Indigo Blu Gilding Flakes (Chariot of Fire, Eton Mess), Sticky Sheet (Sizzix), Vintage Wallpaper EF (ret SU), Palm Fancy Die (HA)

Enjoy!


If you would like to subscribe by email,
please fill out the contact form in the upper right sidebar.
It is also important to add stampingwithklass1@gmail.com to your contact list
so Google recognizes the address and delivers the updates.

To unsubscribe please use the same form on the sidebar adding
unsubscribe to the message.

Thanks to all who have subscribed to my blog by email.
Your sweet and thoughtful comments warm my heart!

Tuesday, April 21, 2020

Gilded Holly

Hi there.  I'm so glad you stopped by!

How are you?  I hope you and yours are staying healthy and
not worrying too much.  I'm trying to focus on the uplifting stories
I see and hear and trying not to worry about the rest.


I've needed the fan on in the studio for most of the month, but had a day 
cool enough to turn it off and get out the Gilding Flakes.
If you've ever used them with a fan on, you know what I mean! ;-)
Cathy is asking for us to use gilding flakes at CAS Stencil.

I used a Tim Holtz holly stencil and a piece of cut-n-dry foam pad to spread
Flitter Glu through the stencil.  I removed the stencil and covered
the piece with these gold flakes pressing down with my fingers.

When it seemed the flakes were covering good, I used the scrubby thing
to brush off the excess.  The leaves still felt a little sticky so I took out
some little scraps of foil and used a bone folder to rub it over the stickiness.
It gave it a bit of a golden grunge look.

I love the way my friend Ros tucks a bit of same color die cuts
on her cards and I copied that idea with a pine branch.  A gold embossed
sentiment on a strip of vellum finishes it off.

.  This shows the shine, but the background is washed out.
Oh, well.  Hopefully you can get the idea.
It really looks much better IRL.


Challenges:
CAS Stencil: Gilding Flakes


Thanks for the visit and special thanks for your comments.

Enjoy!

Card Recipe
Stamps:  Think Big Christmas (PTI)
Ink:   WOW Emb. Pad
Paper:  Neenah Natural, Vellum, Gold Foil (SU) 
Other:  Holly Bough Stencil (TH), Flitter Flu, Chariot of Fire Mega Flakes (Indigo Blu), Gold EP, Holiday Greens Die (TH)