Showing posts with label CAS Christmas. Show all posts

Wednesday, November 23, 2022

Sparkling Snowflakes

Hi there.  I'm so glad you stopped by!

I have more cards made from projects I did using Vaseline on stamps.


For this technique, we spread a little Vaseline on a lid and picked up some with a piece
of foam to lightly cover the stamp or a stencil.  I used a background snowflake stamp here.

We stamped it down on a piece of Yupo paper then added 91% alcohol or blending
solution on top followed by drops of alcohol ink.  All the alcohol or blending solution
allowed me to use my Tim Holtz puffer to blow the ink around a bit.

When we were happy with the results, we wiped with a soft cloth and it
revealed the stamping.  The Vaseline had acted as a resist.

On this piece the color was so strong that I didn't think the snowflakes showed well.
So I put some alcohol on a paper towel and wiped the surface of the piece thinking
that I could just start over.  The snowflakes resist still showed up and gave me a
perfect background for some sparkly snowflakes.


Challenges:


Card Recipe
Stamps:  Hand Drawn Snowflakes Background (HA)
Ink:   Alcohol Ink (Sailboat, Indigo, Amethyst)
Paper:   Yupo, Neenah Solar White, Dazzling Diamonds Glimmer (SU), Silver Foil
Other:  91% Alcohol, Greetings Die (PB), Tis the Season Die (Creative Expressions), Stitched Alpine Snowflakes Dies (PS)


Enjoy!


If you would like to subscribe by email,
please fill out the contact form in the upper right sidebar.
It is also important to add stampingwithklass1@gmail.com to your contact list
so Google recognizes the address and delivers the updates.

To unsubscribe please use the same form on the sidebar adding
unsubscribe to the message.

Thanks to all who have subscribed to my blog by email.
Your sweet and thoughtful comments warm my heart!

Monday, October 10, 2022

Sparkly Pine Cones

Hi there.  I'm so glad you stopped by!


I love these botanicuts from The Greetery!


The pine boughs were cut from Neenah and sponged with Distress Oxide ink.
The pinecones were colored with Copics.

I added some Snow-Tex I found on clearance at Michaels to the pine cones
and added some fine glitter.  The pine boughs have glitter too.

Challenges:
52 Christmas Card Throwdown -  Color Challenge - Brown, Green & White
Peace on Earth Christmas #25 - Inspired by bottom left of mood board
Winter Wonderland - Let it Snow


Card Recipe
Stamps:  Season's Wishes (PB)
Ink:   Soft Suede, Rustic Wilderness DOX, Vintage Photo DI
Paper:   Neenah Solar White
Other:  Botanicuts Pine Bough (Greetery), Copics (E23, E25), Snow-Tex (Deco Art) Crystalina Rainbow Super Fine Glitter (Sweet Poppy), Gold Sparkle Crystals (Studio Katia)


Enjoy!


If you would like to subscribe by email,
please fill out the contact form in the upper right sidebar.
It is also important to add stampingwithklass1@gmail.com to your contact list
so Google recognizes the address and delivers the updates.

To unsubscribe please use the same form on the sidebar adding
unsubscribe to the message.

Thanks to all who have subscribed to my blog by email.
Your sweet and thoughtful comments warm my heart!

Monday, September 19, 2022

More Fun with Gesso

Hi there.  I'm so glad you stopped by!


This Christmas tree came out kind of wonky, but I like it anyway.

I used a stencil to smoosh gesso on kraft cardstock.

When the gesso was dry, I replaced the stencil and used a sponge dauber to
add some Rustic Wilderness Distress Oxide ink over the gesso.

I cleaned the stencil again while the ink dried and replaced it to trace around
the edges with a Heat Active Pen and gold foil.  Obviously I didn't have the stencil
placed exactly right which caused the wonkiness.  To add some sparkle, I winked the tree.

At this point I almost tossed the whole thing.  I decided instead to sponge
some white ink around the tree and add some Chunky White embossing powder.
heating from below for snow.

An added gold mat convinced me that this was a keeper.

Challenges:
CAS Mix Up - Gesso with a Stencil 
CAS Christmas - Sparkle and/or Shine

And a twofer....


Another card using gesso through a stencil.  This time I let the gesso dry then used
Blending Brushes to add ink.  A damp paper towel removed the color from the gesso.


Card Recipe (card 1)
Stamps:  Noel (OOB)
Ink:   Whisper White, Rustic Wilderness (DOX), Gathered Twigs (DI)
Paper:   Crumb Cake (SU), Gold Foil (SU)
Other:  Christmas Trees Stencil (Artplorations), Gold Stencil Paste, Heat Active Pen (Crafts & Co), White EP, Chunky White Frantage (Stampendous), Wink of Stella, Stitched Rectangle Die (SSS)

Card Recipe (card 2)
Stamps:  Bitty Birthday Wishes (MFT)
Ink:  Mustard Seed, Carved Pumpkin, Wilted Violet (DI), Whisper White
Paper:  Neenah Solar White, Neenah Natural, Black
Other:  Gesso, Layering Mini Stencil Set 4 (TH), Flower Stems 1 Die (TH), White EP


Enjoy!


If you would like to subscribe by email,
please fill out the contact form in the upper right sidebar.
It is also important to add stampingwithklass1@gmail.com to your contact list
so Google recognizes the address and delivers the updates.

To unsubscribe please use the same form on the sidebar adding
unsubscribe to the message.

Thanks to all who have subscribed to my blog by email.
Your sweet and thoughtful comments warm my heart!

Thursday, September 15, 2022

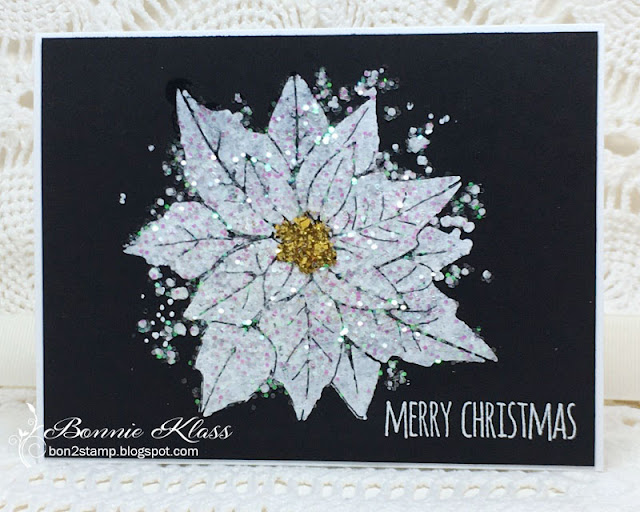
Sparkly Poinsettia

Hi there.  I'm so glad you stopped by!

There's still time to join in at CAS Mix Up.


Hilary is hosting the challenge and she's asking for us to use Gesso with a stencil
on our CAS cards.


I used a Time Holtz stencil and applied Gesso through it onto a piece of
heavy black cardstock.

It's best to use a light hand with the Gesso and build it up slowly.
Unfortunately I didn't realize that at the time and had some oozing under
the stencil that made for a messy look.

While doing this during a Zoom session, Christine suggested using a
black marker to "clean it up".  It worked really well!
Thanks Christine.

I decided to leave this white instead of coloring over the Gesso and went
for sparkle instead.

I replaced the stencil and sponged some glue over the petals, removed the stencil,
 then sprinkled some white glitter over top.  I replaced the stencil and daubed some glue
over the center, removed the stencil and sprinkled gold glitter.

The sentiment has been stamped and heat embossed.

I'm still finding glitter in the studio!

Check out what the rest of the Design team has done and
I hope you'll join us at CAS Mix Up.

Challenges:
CAS Mix Up - Stencil using Gesso
CAS Christmas - Sparkle and/or Shine
Flower Challenge - Add Sparkle (Flower must be main image)
NBUS - Never Before Used Schtuff (Stencil)


Card Recipe
Stamps:  Scribbly Christmas (TH)
Ink:   Whisper White
Paper:   Black Licorice (MFT)
Other:  Gesso, Glitter


Enjoy!


If you would like to subscribe by email,
please fill out the contact form in the upper right sidebar.
It is also important to add stampingwithklass1@gmail.com to your contact list
so Google recognizes the address and delivers the updates.

To unsubscribe please use the same form on the sidebar adding
unsubscribe to the message.

Thanks to all who have subscribed to my blog by email.
Your sweet and thoughtful comments warm my heart!

Friday, August 12, 2022

Pine Bough Joy

Hi there.  I'm so glad you stopped by!


I was excited to have a reason to pull out this NBUS die set that I got for 
Christmas last year.  It's taken me far too long to put it to use!

I die cut the branches and pinecones from white cardstock and colored
with Copics.

I used the frame die that was in the same Christmas package.
It was it's first outing too.

I'm not going to wait so long to use this set again.
I love the way they go together.

Challenges:
CAS Christmas - Trina's challenge - Pine
Krafty Chicks #624 - Christmas
NBUS #41 - Never Before Used Schtuff (Pine dies)


Card Recipe
Stamps:  SEason's Gifts (PB)
Ink:   Christmas Pine (GKD)
Paper:   Neenah Solar White
Other:  Botanicuts Pine Bough (Greetery), Nordic Frames (Greetery), Copics (G40, G43, G46, E23, E25, E27)


Enjoy!


If you would like to subscribe by email,
please fill out the contact form in the upper right sidebar.
It is also important to add stampingwithklass1@gmail.com to your contact list
so Google recognizes the address and delivers the updates.

To unsubscribe please use the same form on the sidebar adding
unsubscribe to the message.

Thanks to all who have subscribed to my blog by email.
Your sweet and thoughtful comments warm my heart!


Thursday, July 21, 2022

Dash Away All

Hi there.  I'm so glad you stopped by!


This Santa die had been hanging out in my NBUS box since last Christmas.
It's about time I  used it.

I cut a piece of salted watercolor for the background and die cut Santa and his reindeer 
twice from a snippet of black cardstock. I glued the two pieces together for 
some depth.

The houses were cut from another snippet of brushed silver cardstock.  I pressed the
edges of the roofs in VersaMark and sprinkled with a twinkly embossing paste

I found a tiny star stamp and stamped a few stars in the sky and embossed them.

I added a frame from my UFO box and stamped and embossed the sentiment.

Another one for the Christmas stash!

Challenges:
NBUS #40 - Santa Die
Jingle Belles - Bring on the Bling (glitter embossing powder)
Double Trouble Paper Crafts - Christmas in July


Card Recipe
Stamps:  Bitty Holiday Wishes (MFT), Mini Stars (?)  
Ink: VersaMark
Paper:   Neenah Solar White, Watercolor (Arches Cold Press), Black, Brushed Silver
Other:  Dash Away All die (TH), Holiday Home Dies (ret SU), Metallic Platinum Sparkle EP (WOW)


Enjoy!


If you would like to subscribe by email,
please fill out the contact form in the upper right sidebar.
It is also important to add stampingwithklass1@gmail.com to your contact list
so Google recognizes the address and delivers the updates.

To unsubscribe please use the same form on the sidebar adding
unsubscribe to the message.

Thanks to all who have subscribed to my blog by email.
Your sweet and thoughtful comments warm my heart!

Friday, June 10, 2022

Wreaths for CAS Christmas

Hi there.  I'm so glad you stopped by!

We're already almost halfway through the year and my 
Christmas stash isn't half full.  I need to step it up!


I love wreath stamps, die, embossing folders.

You name it, if it's a wreath, I'm in.  So I was happy to see that my friend
Linda chose wreath for the CAS Mix Up Challenge.

I didn't need anymore wreath dies, but I thought I needed this one
from Tim Holtz anyway.

I may not need it, but I'm enjoying it anyway.

I've die cut from Neenah Solar White and colored with Copic Markers
in an ombre fashion.

After coloring, I stacked two together (made myself dizzy turning it
around and around to get the best placement).

I die cut a sprig of berries and colored that with Copics too.

It all fits on a piece I'd stenciled with embossing paste for some
rustic texture and I added a brass foil noel.

Here's a closeup so you can see the texture and shine....


A twofer....


This time I colored with lighter greens and added some poinsettias with 
glittery stones in the center.

I've embossed the background for a more elegant feel and added the
sentiment on a stitched circle in the center.

Challenges:
CAS Christmas - Wreath
CAS Mix Up - Stencil paste or gel
Double D - White plus one other color only (card 2)
Jingle Belles - Ombre
NBUS #39 - Never Before Used Schtuff (wreath die)


Card Recipe (card 1)
Stamps:
Ink:   
Paper:   Neenah Solar White, Brass Foil
Other:  Funky Wreaths Die (TH), Holiday Greens Mini Die (TH), Holiday Words Script Die (TH), Copics (G82, G24, YG17, G28, E23, R29, R37), Texture Scraped Paint Stencil (ret MB), Embossing Paste (Wendy Vecchi), 

Card Recipe (card 2)
Stamps:  Seasons Greetings (OOB)
Ink:   Versafine Onyx Black
Paper:   Neenah Solar White
Other: Funky Wreaths Die (TH), Copics (G82, G46), Poinsettia Parade Die (SSS), Double Stitched Circles (LI), Gold Sparkle Crystals (Studio Katia), Subtle EF (SU)


Enjoy!


If you would like to subscribe by email,
please fill out the contact form in the upper right sidebar.
It is also important to add stampingwithklass1@gmail.com to your contact list
so Google recognizes the address and delivers the updates.

Thanks to all who have subscribed to my blog by email.
Your sweet and thoughtful comments warm my heart!

Wednesday, February 23, 2022

Two Fer Christmas

Hi there.  I'm so glad you stopped by!

Challenges are getting ready to close so I'm hurrying to get these in.

First up for Jingle Belles...


I used a retired embossing folder for most of the pine branches and
gently rubbed some ink over the raised design with a sponge dauber and
Distress Oxide ink.  The branches on top were die cut and sponged also.  Then I
added a little glue and some glitter to make the branches sparkle.

The stocking has been die cut and embossed for texture. I found these little
pom-poms in my stash.  They sparkle!

As you can see the glitter has stuck all over the card front.
I'll have a sparkly Christmas box!

My twofer....

My sweet friend Christine is hosting at CAS Christmas and is
asking for a Winter scene.

I hemmed and hawed about what to do for this challenge and ended up with...


A die cut scene and added little die cut house.  I wanted to hang a wreath
on the door, but couldn't fine anything small enough.

Another very schparkly card!

Challenges:
ABC Christmas Challenge - C for CAS or D for Distressing
CAS Christmas - Winter Scene
Jingle Belles - Stocking Holiday


Card Recipe (card 1)
Stamps:  Mix and Match Christmas (Kaisercraft)
Ink:   Cherry Cobbler (SU), Rustic Wilderness (DOX)
Paper:   Naturals Ivory, Cherry Cobbler, Neenah Solar White
Other:  Pine Bough EF (ret. SU), Half and Half Stockings Die (Hot Off the Press), Holiday Knit EF (TH), Pretty Pines Thinlits (ret. SU)

Card Recipe (card 2)
Stamps:  Scripty Holiday (GKD)
Ink:   Versafine Onyx Black
Paper:  Lindy's Magicals (background), Stitched Circle Trees Die (MB), Winterhaven Dies (CP), Chunky White Frantage, Sweet Poppy Glitter
Other:  


Enjoy!


If you would like to subscribe by email,
please fill out the contact form in the upper right sidebar.
It is also important to add stampingwithklass1@gmail.com to your contact list
so Google recognizes the address and delivers the updates.

Thanks to all who have subscribed to my blog by email.
Your sweet and thoughtful comments warm my heart!

Thursday, January 13, 2022

Silver & Gold

Hi there.  I'm so glad you stopped by!


My friend Julia is hosting this month's CAS Christmas Challenge 
and it's an elegant one.


I've die cut the mistletoe from silver and gold foil and put it with some embossing.

The sentiment was heat embossed.

And another this time using an Alexandra Renke die and embossing
the die cut.  It's paired with silver Glimmer paper and a fancy bow.


Challenges:
CAS Christmas - Silver & Gold
Krafty Chicks - Christmas
Peace on Earth - Anything Goes


Card Recipe (card 1)
Stamps:  Season's Greetings (There She Goes OOB)
Ink:   Encore Gold
Paper:   Neenah Natural, Gold Foil, Silver Foil (SU)
Other:  Mistletoe Bundle Die (MB), Gracious Leaves EF (MB), Subtle EF (SU), Gold EP


Card Recipe (card 2)
Stamps:  Season's Greetings (There She Goes (OOB)
Ink:   Encore Gold
Paper:   Neenah Natural, Gold Mirror (Tonic), Silver Glimmer (SU)
Other: Branch with Leaves Die (Alexandra Renke), A2 Thin Frames Die (SSS), Subtle EF, Tasteful Texture EF (SU), Gold EP, Silver Twine


Enjoy!


If you would like to subscribe by email,
please fill out the contact form in the upper right sidebar.
It is also important to add stampingwithklass1@gmail.com to your contact list
so Google recognizes the address and delivers the updates.

Thanks to all who have subscribed to my blog by email.
Your sweet and thoughtful comments warm my heart!