Showing posts with label 3D flowers. Show all posts

Thursday, January 2, 2014

Featuring Cary with Tissue

The Featured Stamper at SCS this week is Cary (Miss Minx).  I really enjoyed browsing her gallery and chose this card to CASE.  This is what I came up with.


The Ways to Use It challenge, also at SCS, was to use left over gift wrap on a project.  Our trash had gone out so it was slim pickins around here for leftover paper.  Then I had lunch with a friend and she brought a lovely Christmas gift wrapped in this green and white striped tissue.  And I got a Playground prize from Di that was wrapped in this gorgeous pink tissue. That got the wheels rolling in my brain.  When I saw Cary's layout, I had an Eureka moment! 

The hardest part was to get the partial embossing on the card front.  For the partial embossing,  I was using some plastic templates (no name left on the package) that I had bought at Michaels a while back.  I think it took 4 tries and then I messed the only good one up by stamping the sentiment crooked. When I adhered a punched sentiment over that, it was crooked too!  #*#%@*

After 3 more tries, I got the embossing right and used a Sizzlit to cut out the flowers (the set has 3 graduated sizes of flowers and leaves).

This time I got the sentiment right.

Phew!

Pixie's Snippet Playground (that started this journey with the pretty pink tissue) will hopefully let me in with the snippets of tissue paper.

All supplies are Stampin' Up! unless otherwise noted

Card Recipe
Stamps:  Gifts of Kindness
Paper: Whisper White, snippets of tissue paper
Ink:  Tuxedo Black (Memento)
Other:  Perfect Polka  Dots EF, Plastic Embossing template (??), Birds and Blooms Sizzlit (retired), Basic Pearl

I hope the New Year is off to a good start for you.  The boys are back in school and I was able to get all my errands done.  Now to find some mojo in the craft room!

Thanks for stopping by.

Enjoy!


Sunday, June 16, 2013

Yellow

I've got to be quick.   I've had this card made for several days but couldn't get the photo edited. 


The CASology challenge this week is


If you haven't been over there, you've missed the sunniest, most cheerful gallery ever!

CAS-Colours and Sketches has a sketch this week that worked wonderfully for this card.


When I saw it, I immediately thought of the daisies I made a couple of weeks ago.  Directions and another daisy card are here.

And I used some of the leftover paper to make another card.


I'd better get over to CASology.  They're about to close the door. 

Edited to add:  In my haste I forgot a challenge.  Hope it's not too late.  Addicted to Stamps and More #49 is ADDICTED TO CAS.  This is a favorite of mine. 

All supplies are Stampin' Up! unless otherwise noted

Card Recipe
Stamps:  Made for You (retired)
Ink:  Daffodil Delight (card 1), Pear Pizzazz (card 2)
Paper:  Whisper White, Daffodil Delight, DSP (retired)
Other:  Essentials Paper Piercing Pack, Paper Piercing Tool, Itty, Bitty Shapes Punch Pack, Crystal Effects, Daisy Punch (Paper Studio), Rose Leaf Punch (MS)

Thanks so much for stopping by.  I hope you'll come back soon.

Enjoy!


Tuesday, June 4, 2013

Circle Piercing for Queen Stacy

The Queen at SCS this week is Stacy, aka twinshappy!  Stacy has a wonderful gallery, full of inspiration.  She's also very encouraging with her comments and has endeared herself to many, many of us at SCS.  I chose this card as my inspiration.  Here's my version....


Did you notice that I've jumped on that Washi wagon?  LOL, I wasn't going to get caught in that.  Then I was visiting Hobby Lobby and they had some on clearance.  And it was yellow!  So what was I to do?  It jumped in my hands and rode home with me.  Then I got the new Stampin' Up! catalog and saw that they have some.  That jumped in my cart too. So I guess I'm going to be using Washi!

The daisy is inspired by my friend Loll.  You may remember that I've used some of her beautiful, big daisies that she sent me.  You can see one of those cards here and another here.  Loll has also made some small daisies that fell in love with on her blog.  So while I was at Hobby Lobby, a daisy punch landed in my bag too. LOL, I need to stay out of that place!  I think I got it pretty close to Loll's.  Thanks, my friend, for giving the details so I could make some candy!

I punched 2 daisies from some scraps of Whisper White and folded each petal by laying my bone folder along the center and pulling the sides up with my fingers.  Does that make sense? Then I laid each on my piercing mat and used a large stylus to press the center.  This brings the petals up.  I punched a scrap of Daffodil Delight with the circle from the Itty Bitty Punch Pack and added some Crystal Effects to the top of it.  After it was good and dry I glued one punched daisy on top of the other and added the circle.  And did a joyful dance!  It looked like I wanted it to! 

Loll has a tutorial for her large daisy.  If my how to is clear as mud, check that out.  She did pictures and a wonderful, step by step tutorial.

Addicted to CAS is going in Circles this week


The CAS challenge at SCS this week is Tool Time-Use Your Paper Piercer!  The daisy is a circle with a circle in the middle and I've pierced a big circle all round.

Simon Says Challenge is still doing ANYTHING GOES so I'm taking this over there to join the nearly 1000 other cards in that gallery.

Pixies Playground is still in one piece despite the fact that Di is off celebrating elsewhere.  So I'll take my snippet daisy over there to play.

Wow, that's a lot of challenges for this super CAS card!

All supplies are Stampin' Up! unless otherwise noted

Card Recipe
Stamps: So Happy for You (retired)
Ink:  Tuxedo Black (Memento)
Paper:  Daffodil Delight, Whisper White
Other: Itty Bitty Punch Pack, Scallop Edge Corner Punch (retired), Essenstials Paper Piercing Pack, Paper  Piercing Tool, Crystal Effects, Daisy Punch (Paper Studio), Washi Tape

I'm so glad you could stop by. I hope you'll come again soon.

Enjoy!


Thursday, May 24, 2012

3D Flowers

I've been busily preparing for a Stamp Stack coming up next month and I've gotten behind on everything else.  There just doesn't seem to be quite enough time to do everything I want to do.  Do you have that problem?

 I'm just under the wire on the SUO challenge to create a project with 3-dimensional flowers on it.

I knew I wanted to use this folded flower that was sitting on my desk.  You can find the tutorial for it here.


The Color Challenge at SCS this week is to use the retiring In Colors.  Dessert is to use at least 3 of these colors and tell which color we will miss the most.

I've used Poppy Parade DSP, Blush Blossom cardstock and Pear Pizzazz Seam Binding and ink.  I've loved all of these colors and I'm sad to see all of them go.  Though I didn't use it on this card, I think Concord Crush has been my favorite.  It's such a rich, regal shade of purple.

All supplies are Stampin' Up!

Card Recipe
Stamps:  Loving Thoughts
Ink:  Pear Pizzazz
Paper:  Whisper White, Blushing Bride, Poppy Parade DSP
Other:  Big Shot, Elegant Lines EF, Pear Pizzazz Seam Binding. Pearl (from the retired Pretties kit)


I'm excited about using the new In Colors.  I love the bright shade of Gumball Green, the rosy dark pink of Primrose Petals, the deep rose red color of Raspberry Ripple, the deep yet bright blue of Midnight Muse, and the greenish yellow of the Summer Starfruit.

The new inkpads are terrific.  Just a light tap and the stamp is inked.  I can see now that I'll be replacing all my inkpads.

I had some delightful news on Saturday from The Paper Players.  My Pocket Silhouettes card was chosen as Jaydees Cut Above.  Thanks so much Jaydee.

The same card was listed in the CAS Favorites on Sunday, May 20 and as the Featured Upload this week at Splitcoaststampers.   I'm not sure what this upload thing is.  Hopefully, I'll find out soon.  It sounds good though, doesn't it?)

This card was also a CAS Favorite at Splitcoast Stampers on Sunday.

These kudos, your comments and emails all inspire me to keep creating.  Thanks so much.

Enjoy!

Wednesday, April 25, 2012

Great Sketch

I love the Paper Players sketch this week.  It's a variation of my favorite CAS layout.

I used one of my 3D folded flowers on this one.  It's made with the flower made for the tutorial. (You can scroll down for the tutorial.)


Here's the sketch.


Here's another that I did with a piece from my UFO box.  I love the sweet flowers from this set and I'll be sorry to see them leave the catalog.  They'll still be on my shelf though.


I left off the scallops on this one, since I have some of that beautiful Daffodil Delight Satin Ribbon.

All supplies are Stampin' Up! unless otherwise noted

Card Recipe (card 1)
Stamps:  Loving Thoughts
Ink:  Whisper White
Paper:  Whisper White, Real Red, DSP
Other:  1 3/8" Circle,  Small Scallop Circle and Scallop Edge Punches, Jumbo neutral brad, Big Shot, Stripes EF

Card Recipe (card 2)
Stamps:  Happiness Shared
Ink:  Jet Black StazOn, Old Olive SU Marker
Paper:  Whisper White, Daffodil Delight
Other: Daffodil Delight Reinker, Aqua Painter, Big Shot, Stripes EF, Scallop Circle die (Nestabilities), Daffodil Delight Satin Ribbon

I'm glad you could stop in.  I hope you found some time to stamp today.

Enjoy!

Folded Flower Tutorial

I had a request for a tutorial for the folded flower card I posted here.  I also posted another flower with this technique here.  And here is another card with the folded flower.


Punch 9 circles.  I used the 1 3/8" Circle Punch for this flower


Fold 8 circles in half using your fingernail to get a good crease.


Fold in half again.


And in half again.


You should have 8 circles folded in 1/8s.


Lay the folded pieces on the 9th circle with the points facing center and glue in place.


This is what it will look like when you're finished.


And here's a side view.


Put a brad in the center.


Punch a scalloped circle of the same or coordinating paper to put behind the flower.


Take a deep breath, pat yourself on the back, and mount it on a card.


I hope this tutorial is helpful and you have fun making these pretty posies.  If you have any questions just email me.

Enjoy!

Sunday, April 22, 2012

Neutrals

Hello y'all!  I've been wanting to post some cards that I did for challenges at SCS last week.  Do your weeks fly by too, or does the time just fly in my neck of the woods?

First, here's a card I did for the CAS challenge last Monday. You can take a look at Mary's (stampercamper) lovely card that inspired the sketch.  I love this sketch.  So simple yet classy.

And this is what I came up with.


This is one of the flowers that Barb taught us to make.  We punched 9 circles (I used a 1 3/8" circle punch).  Fold 8 of them in half, in half again and in half again.  We spread glue on the unfolded circle.  (I used Multipurpose Liquid Glue.)  We inserted a brad or bead and were finished.... with the flower.  I needed this sketch for the perfect layout to add it to.

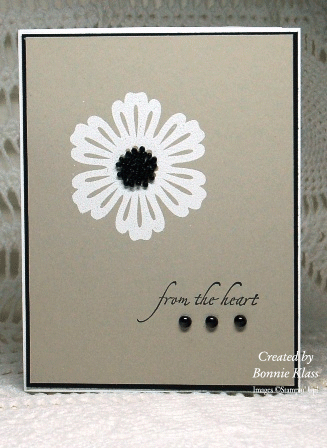
While I had my neutrals out, I inked up a stamp in my new Mixed Bunch set.


The Color Challenge at SCS was to use Whisper White, Basic Gray and Sahara Sand.  I found the piece of Sierra Sand with the sentiment already stamped.with Basic Gray.  How lucky was that?

I inked the flower with Whisper White craft ink and heat embossed it with white Embossing Powder and centered it with some black micro beads.

It needed just a little something else, so I colored some basic pearls with a black Sharpie, and added them.

All supplies are Stampin' Up! unless otherwise noted

Card Recipe  (card 1)
Stamps:  Loving Thoughts (Occasions Mini)
Ink:  Chocolate Chip
Paper:  Crumb Cake paper pack DSP, Acrylic paper (non SU)
Other:  1 3/8" Circle, 1 3/4" Circle, and 2 1/2" Scallop Circle punches, Jumbo (5/16") Neutral brad


Card Recipe (card 2)
Stamps:  Mixed Bunch, (retired sentiment)
Ink:  Whisper White, Basic Gray
Paper:  Whisper White, Basic Black, Sahara Sand
Other:  White EP, Basic Pearls, Micro Beads (non SU)


I hope you have had a wonderful weekend.  We've had some much needed rain here.  It was a good day to stamp.  I didn't get a chance to stamp, but it was a good day nonetheless.

I'm so happy you stopped by.  I hope you can come again soon.

Enjoy!

Wednesday, June 16, 2010

Banana, Moss and Red

Two cards for you tonight. The color challenge this week is to use Barely Banana, Mellow Moss & Real Red. Barely Banana & Mellow Moss will be history in two weeks. Maybe I should have made a sympathy card! Now that I think about it, this would be a good sympathy card!


I had trouble with this challenge and I love all three colors. Do you have those days when nothing goes right? I had one of those yesterday when I was trying to do this card. I thought of my red lilies at our old house. I bought them at the Farmer's Market and they were planted outside my bedroom window. I enjoyed seeing them each morning when I opened my blinds.

You can find the tutorial here. While you are there, be sure to check out Heidi's other posts. She has some awesome ideas!

Card Recipe Paper: Barely Banana, Whisper White, Real Red, Mellow Moss
Acc.: Real Red & Mellow Moss SU Markers, Big Shot, Perfect Dots Embossing Folder, Ovals Die, Linen Thread, Extra Large 2 Step Bird & Large Oval Punches


When I couldn't figure out what to do with the lilies, I used the colors with the True Friend set. This set will be one to retire in 2 weeks.

It is an old layout, tried and true. That's a ladybug under the sentiment. Directions are on a previous post.

I've heard my aunt, who is 94, has been under the weather. I thought I would send this to her.

Card Recipe
Stamps: True Friend, Short & Sweet
Paper: Barely Banana, Mellow Moss, Whisper White, Real Red, Basic Black
Ink: Barely Banana, Real Red, Mellow Moss
Acc.: Banana Brad, Ticket Corner, Large Oval, Scallop Oval, and 1/4" Punches, Big Shot, Perfect Dots Embossing Folder


What wouldn't go together yesterday seemed to fit into place today. It's much more fun when things fall into place. I can really appreciate having fun today. Hope you had a good day too.

Happy Stampin',
Bonnie