Showing posts with label Short and Sweet. Show all posts

Friday, July 20, 2012

Fabulous Baby Wipes

I'm really pushing the limits on challenges this week.  I think I can get this in if I don't do much chatting.


The SUO challenge was to do a special thank you card.  That's the challenge I'm a donkey's tail on.  I'm so glad I could get to the stamp room this evening and get this done. Thank you ladies for this challenge and for giving us 2 weeks to get it done as well as wonderful inspiration.

I used the colors from the Play Date Cafe.


Aren't they sweet colors?

I used the Baby Wipe technique to ink the flower and stem.  You may have to log in to Splitcoaststampers to see the tutorial.  It's easy to sign up if you're not already and well worth the little bit of time it takes to do it.  It's a free sight too.

All supplies are Stampin' Up!

Card Recipe
Stamps:  Fabulous Florets, Teeny, Tiny Wishes
Ink:  Wild Wasabi, Re-inkers (So Saffron, Wild Wasabi, Blushing Bride, Cameo Coral)
Paper:  Whisper White, Cameo Coral (retired)
Other:  Baby Wipes, Big Shot, Argyle EF, Beautiful Wings Embosslit, Basic Pearls

Did I tell you that Jack is walking now?  He get so tickled with himself.  I've tried to get a picture but he's not still long enough to get a good shot.  I'll catch him yet and show him off.

I hope you have a great weekend and get some time to stamp.  Thanks so much for stopping by.

Enjoy!


Friday, May 18, 2012

Tree Trimmings

Busy, busy day, but I wanted to post my Merry Monday card.


I love this simple sketch.


 And did you notice that I used DSP?  Yeah, me!

I stamped the ornament on Blushing Bride with Real Red, then smacked it with my VersaMark pad and clear embossed.  I used a glue pen to line the pink parts and sprinkled Dazzling Diamond on it to give it some sparkle.  I wasn't sure whether the glue would stick to the embossing, but so far, so good.  I added some sparkle to the boughs too.  In hindsight, I should have stamped the boughs at a different angle.  Maybe I'll remember that next time.

The ribbon is stamped in Encore Gold and heat embossed with Gold.

The design piece is 2" x 4", the red mat is 1/8" larger and the white behind that is 1/8" larger still.  The red band is 1 3/4" x 4 1/4" and was a scrap piece of textured Real Red.  The DSP is 4" x 5 1/4".  It's actually 2 pieces that were in my scrap box.  The band covers the seam.

I used my Stamp-a-majig for placement and did the sentiment in two steps instead of all on one line.

All supplies are Stampin' Up!

Card Recipe
Stamps:  Lovely as a Tree, Tree Trimmings, Short and Sweet
Ink:  Old Olive, Always Artichoke, Real Red, Encore Gold
Paper:  Whisper White, DSP, Real Red
Other:  Dazzling Diamonds, Gold EP, Basic Pearls


Thanks so much for stopping by.

Enjoy!

Tuesday, May 15, 2012

Pocket Silhouettes

I'm going to miss using my Pocket Silhouettes on a regular basis.  It's definitely a set that I will keep in my collection.


This card is for several challenges.  It's rare for me to combine many challenges because my brain goes into overload if I try to think of too many things at once.  But things kinda worked out together this time.

First off is the Less is More challenge

ONE LAYER CARD
This time we have the stipulation to
USE THREE STAMPS
not four, not two... but 3!


And the Paper Players challenge.  Ann chose the colors.

And finally the CAS challenge at SCS

CAS170 - Technique Challenge

Divide an image or scene into 3 pieces. 


I didn't divide an image as in stamping it and cutting it apart since I wanted to keep it a one layer card.  I punched 3 squares from scrap to make a mask, held it on my card front with sticky notes and stamped the design in 3 sections then sponged the background before removing the mask.

I used 2 of the stamps from the Pocket Silhouettes set and a stamp from Short and Sweet to make up the three.  I inked the flowers with Poppy Parade and Daffodil Markers.  The stems are Soft Suede and the background is sponged in Baja Breeze.  I outlined the squares with Soft Suede.  The soft squares kinda got lost without it.

All supplies are Stampin' Up!

Card Recipe
Stamps:  Pocket Silhouettes, Short and Sweet
Ink:  Baja Breeze, SU Markers (Poppy Parade, Daffodil Delight, Soft Suede)
Paper:  Whisper White
Other:  1" Square Punch (for mask), Stampin' Sponge


I was so happy to see a shout out from last week's Merry Monday challenge.  Wendy chose my Christmas Rose card as an Honorable Mention.  I'm so glad she enjoyed it.

Thank you for your visits and for the kind comments.  It's always nice to know that you enjoy my cards as much as I enjoy yours.

Again, enjoy!


Monday, October 17, 2011

Getting Triangular

Last Wednesday, Susan offered up the One Layer Wednesday challenge that freaked me out!

Use at least one triangle on a card. You may use a real triangle (stamped, sponged) or images that are have an overall triangular profile or embellishments arranged in triangles. You may even choose to make a triangular card base!

After a lot of thought and searching for triangles, I chose the Season of Friendship set.  Mainly because I needed some more Thanksgiving cards.  I see lots of triangle in this card when I look for them.


I used the colors from the Color Challenge at SCS last week.  They were Tempting Turquoise, Pumpkin Pie, and Elegant Eggplant.

I inked the leaves in Pumpkin Pie and thumped with an Elegant Eggplant marker.  The sentiment is also in Eggplant.  The little bird was stamped on a scrap, cut out and adhered with a glue dot.


This next card has the triangular shaped trees and they are arranged in a triangle.

The sentiment was a bit too small and seemed lost so I added some scoring and ribbon.  Then I added some Dazzling Details below the trees for "snow" and some rhinestones on one tree.  It's hard to see, but I also used some glitter pens that I've had for ages.  They don't even have a  name on them.  Maybe you can see those details better here.


I've gotta tell you, I was terrible in geometry.  I'd rather forget that it even exists!  I can't break down a card and tell you why I like it or even why I lay something out the way I do.  I just go with what pleases me.  The theory behind it all is way beyond my understanding.  That's one reason I like to read Susan's blog.  She KNOWS how it all works.  I am always amazed at her explanations.  Then true to form, I promptly forget what I read.

 These days, the facts I know are that when you feed a baby, they promptly spit up on you and when you start to do anything that doesn't directly involve them, they cry.  If you ignore the cry, they scream.  Then the 3 yr. old starts yelling "take him out of here".  (We always remind him to say please.)  Can you tell it's been a particularly trying day?  Tomorrow will be better. 

Tomorrow will be better.

Tomorrow will be better.

Thanks for the visit and letting me whine.

Card Recipe (Thanksgiving card)
Stamps:  Season of Friendship, Holidays and Wishes
Ink:  Tempting Turquoise, Pumpkin Pie, Soft Suede, Elegant Eggplant Marker
Paper:  Naturals Ivory

Card Recipe (Very merry)
Stamps:  Polar Party, Short and Sweet
Ink:  Jet Black StazOn, Real Red
Paper:  Naturals White
Other:  Watercolor Pencils, Blender Pen, Dazzling Details, Real Red grosgrain ribbon, Simply Scored, glitter pen, rhinestones

Enjoy!

Tuesday, September 27, 2011

Awash with Paper Piecing

Yesteday's Clean and Simple challenge at SCS was to do paper piecing.  This technique is wonderful for using some of those little pieces of DSP that have been left over.  I have a box full of these pieces.


Just a simple layout, but one of my favorites.

  
Card Recipe
Stamps:  Awash with Flowers, Watercolor Minis?, Short and Sweet
Ink:  Old Olive, Rich Razzleberry
Paper:  Whisper White, Scraps of DSP, Melon Mambo
Other:  Big Shot, Square Lattice EF, Scallop Trim Border Punch

Thanks for stopping by today and for all the lovely comments you have been leaving.

Enjoy!

Wednesday, September 21, 2011

Fall Colors

Just a quick post tonight so I can clean up my table and finish up a couple of Halloween cards I was working on this afternoon.  I've had stampin' therapy two days in a row now and I'm feeling good!

This little card is going to several challenges.

The Paper Players #64 Challenge is to make a CAS card using animals or plants.  Thanks Ann, for the CAS challenge.  They're my favorites.

Featured Stamper Challenge at SCS.  You can see Linda's (aka Morningsun47) inspiration card here.  I used a different stamp and colors and left off the buttons.

The SUO (Stampin' Up! Only) challenge#28 is to use Fall Colors.

The Less is More #33 challenge, anything CAS goes.  This is my third card for this challenge.  They are almost half way to their 1000 submissions goal.

I inked the silhouette stamp in the My Friend set with markers, spritzed with water and stamped on Naturals White.  Unfortunately, it didn't stamp well.  So I colored the flowers and leaves with the markers.  I was really disappointed with the way it turned out, but cut it down and made a card from it anyway.

Card Recipe
Stamps:  My Friend, Short and Sweet
Ink:  SU Markers (Cajun Craze, Always Artichoke, Early Espresso)
Paper:  Naturals White, Cajun Craze, So Saffron

Thanks so much for stopping by.  I've enjoyed reading your comments today and visiting your blogs.

Enjoy,

Wednesday, June 22, 2011

Hollyhock Mambo

I think it was last week or maybe the week before I did a card with a garden of hollyhocks.  This design piece was still laying on my table and it seemed perfect for a tall, skinny card!  And that was the CAS challenge this week on SCS.


Or is this a gladiolus?  Hmm...maybe I need to get my flower book out and check!

I stamped the image with Black StazOn painted with ink and a blender pen.   The card is   3 1/4" x 6 1/4" and fits in the SU open end envelope.  I'm not sure why one of the rhinestones doesn't shine like the rest.  Maybe I need to replace that before I send it out!

Card Recipe
Stamps:  Fast and Fabulous, Short and Sweet
Ink:  Black StazOn, Melon Mambo, Garden Green
Paper:  Whisper White, Scraps of Watercolor, Melon Mambo & Basic Black
Accessories:  Blender Pen, White Gel Pen, Ticket Corner Punch, Basic Rhinestones

Thanks for stopping in to visit.  I've been enjoying your comments.

Enjoy!


Wednesday, June 8, 2011

Hollyhock Garden

Hello crafty peeps.  I have finally put down my new cattie, for a few minutes anyway.  I have to put it out of sight to remove the temptation.  I'm like that with cookies and chocolate too!

I did get a card made for the Color Challenge at SCS to use Regal Rose, Pink Pirouette & Melon Mambo.  Dessert is a round embellishment which I totally forgot.


I stamped with the outline stamp in Black StazOn on a scrap of Confetti White cardstock.  Then I put a drop of re-inker of each of the pinks in a lid and used my Aquapainter to color the blossoms. A drop of Old Olive and the Aquapainter colored the stems & leaves.

I used a very simple CAS layout on an embossed Confetti White card.

Card Recipe
Stamps:  Fast & Fabulous, Short & Sweet
Ink:  Melon Mambo, SU Re-inkers (Melon Mambo, Regal Rose, Pink Pirouette, Old Olive)
Paper:  Confetti White, Melon Mambo
Accessories:  Corner Rounder, Word Window & Modern Label Punches

I love to use this set for two-step stamping but I like it with the watercoloring too.  I'll be sad to see this set retire from the hostess sets, but, believe me, there are lots of awesome choices to take it's place!

I'm so glad you could join me today.

Enjoy!

Saturday, June 4, 2011

Ivory and Lace

This card just kind of put itself together. I love it when that happens!
 
I've had this piece of scrunched Vanilla Seam binding hanging out in my ribbon dreawer for quite some time.  I saw the CAS challenge on SCS was to do a card with scrunched ribbon and I pulled it out.

That was Monday.

And it sat there.

Then I went to the Less is More blog first thing this morning. This week their challenge  is colour.  Chrissie & Mandi chose....
MONOCHROME

Encarta definition
mon·o·chrome [ mónnÉ™ krm ] adjective  Definition: 1. in shades of one color: using or displaying only shades of one color or black and white. You may choose any colour you wish, but please keep all the shades you use within your chosen spectrum.

And I drew inspiration from my friend Colleen's Ivory & Lace card.  (When I made the card, I didn't realize I was a week late for that challenge.)  Boy, am I behind!

So I pulled out the only lace I had in my stash and laid the scrunched ribbon on it.  Then, since I wanted to stamp something, I pulled our the rose spray from the Elements of Style set.  I stamped it in Vanilla on the Vanilla card.  I think maybe I should have stamped it in white because it is virtually invisible!  Even under my halogen lamp, I can barely see it!  Believe me it's there.

And I finally used some of those crocheted flowers that I bought over a year ago.  This card will have to be included with a gift though, because it's much too bulky to mail.

Card Recipe
Stamps:  Elements of Style, Short & Sweet
Ink:  Very Vanilla, Encore Gold
Paper:  Very Vanilla
Accessories:  Lace, Very Vanilla Seam Binding. Fleurettes II, Pearl

I love monochromatic cards!  I have an idea brewing for another one.  Maybe I'll get time to play some more.

I wrestled Contact Paper into the kitchen cabinets this morning.  LOL, at one point I had to crawl into the cabinet to get to the back and the paper all stuck to itself! And of course the phone rang just then!  The cabinets are done though and it seems there are more than I originally thought!  Check off one thing on the get it ready to move in list!

Thanks for stopping by.

Enjoy!

Bonnie

Friday, May 6, 2011

Featuring Susan

This week's Feature Stamper at SCS is lateblossom aka Susan who started the One Layer Wednesday challenge.  I have been a fan of her Clean & Simple style for some time and was so excited to see that she was being honored!   I used this card of Susan's as inspiration for this piece...


A while back Susan blogged about having so much colored card stock and especially all the shades of yellow.  I too have lots of yellow.  I love it, but for some reason don't use it that much.  But this time I went all out with the So Saffron.  I thought it went really well with this design.

By the way, I'm not sure what kind of bird this is supposed to be.  He doesn't look like the right shape for a chickadee or goldfinch, but a goldfinch he is.....this time!

You can visit Susan's SCS gallery here and her blog here.

Card Recipe
Stamps:  Every Moment, Short & Sweet
Ink:  Black StazOn, SU Markers (Daffodil Delight, Basic More Mustard, Black, Soft Suede, Garden Green)
Paper:  Shimmery White, More Mustard, So Saffron
Accessories:  Corner rounder Punch

Thanks so much for stopping by today.  I really appreciate all the fine comments you have left!

Enjoy!

Bonnie

Friday, February 18, 2011

Christmas in February


This week's  One Layer Wednesday challenge, over at Simplicity, was to do a Christmas or Season's Greetings card.  Had to use red & green on white or cream.  It had to be one layer (one piece of cardstock folded in half, no additional layers and minimum embellishments).  She even suggested using a non holiday stamp for extra points.

Here's the first one I did.....


This flower is in the Bliss set from the Sale-a-bration catalog.  I always thought it resembled a Poinsettia and thought it was a shame that this set would be long forgotten by Stampin' Up! come Christmas.

I used the Stamp-a-ma-jig and actually got things where I wanted them this time.  I inked the flowers with markers then masked them and inked just one petal in green for a leaf and, again using the SAMJ, stamped the leaves.  They needed something to ground them, so I drew a doodly frame around.  I pressed down too hard on the sentiment, but didn't think it was bad enough to trash.

Then I had another idea with another Sale-a-bration set......


Actually, I planned to stamp a poinsettia on this, but liked it so well without it, I didn't.  I've got to tell you that initially I thought I had ruined this.  I didn't get a good stamp and I figured since I was using the SAMJ and I hadn't moved anything, I could just stamp over.  WRONG!  I ended up with a double image that gave me motion sickness just looking at it!  So I used the marker and kind of filled in between the double lines and blended with the blender pen until it didn't make me queasy.  I really loved the results.

Again, I pressed too hard on the sentiment and got a heavy image.  I hope whoever gets this card won't care.  Probably won't even notice!

Maybe I ought to take the blending pen to the poinsettias. Hmmm....

Card Recipe (Poinsettias)
Stamps:  Bliss, Teeny Tiny Wishes
Ink:  SU Markers (More Mustard, Real Red, Garden Green)
Paper:  Whisper White
Accessories:  Stamp-a-ma-jig

Card Recipe (Filigree Branch)
Stamps:  Sweet Summer, Short & Sweet
Ink:  SU Markers (Garden Green, Real Red)
Paper:  Whisper White
Accessories:  Stamp-a-ma-jig

Enjoy,
Bonnie

Thursday, February 3, 2011

One Layer, Two Hearts

This week's One Layer Wednesday challenge over at Simplicity is 1. stamp a border, 2. stamp an image, 3. Add some bling.

Here is what I came up with.....


I think maybe I overdid it.  Oops!  I used one image twice and a sentiment. Does that count?

 It is a one layer card.  (A one-layer card is defined as a single piece of cardstock folded in half. No other layers of cardstock allowed!)

It also works for the Ways to Use It challenge on SCS which is to put a heart on our card.

I used the Stamp-a-ma-jig again today.  My border still didn't land where I intended, but I'm getting closer.  At least the two stampings matched up!

After stamping the hearts with Basic Black and letting them dry awhile, I used markers and a blender pen to color the flowers.  NOTE:  Be sure to let the black ink dry or it will smudge and make your flowers black.

Card Recipe
Stamps:  Vintage Vogue, Punch Potpourri, Short and Sweet
Ink:  Basic Black, Su Markers (Real Red, Olive Green)
Paper:  Whisper White
Accessories:  Stamp-a-ma-jig, Blender Pen, Real Red Narrow Taffeta Ribbon, Basic Rhinestones

Enjoy,
Bonnie


Monday, January 10, 2011

Clearly a Challenge

Hello Creative People.  I hope you had a wonderful weekend.  I got to stamp with my friends in Roanoke Rapids and we had a really good time.

Today I have 2 posts, if my computer will cooperate!  First up is this....


The Just Add Ink #50 challenge was to use these colors...


Elegant Eggplant and Riding Hood Red????? 

Then I wanted to do a card for the Clean & Simple Fall to Layout #122 challenge.  This is the layout they gave.


I flipped the layout because this card just needed to go vertical.  Two of the squares are stamped in So Saffron with the polka dot stamp from the For All You Do set and the other two with Pear Pizzazz and the floral stamp from Clearly for You.  The latter set is from the new Occasions Mini Catalog.  It has lots of really cute little stamps.

I inked 2 of the birds with my Elegant Eggplant marker and the branch with Early Espresso.  The stamp, also from the Clearly for You set, has 3 birds.  I want to use this for an anniversary card so I only inked 2 of the birds.  No threesome here!  After I stamped those little birds on a piece of scrap, I cut them out.  I must be crazy!  What some of us will do for these cards!
I inked the love from the love you stamp in the Short & Sweet set with the Elegant Eggplant marker and stamped it on the other polka dot square.

The heart, punched from a scrap of Riding Hood Red, completes the colors.

It wasn't the quickest or easiest card I ever did, but I'm satisfied with the results.

Card Recipe
Stamps:  Clearly for You, For All You Do, Short & Sweet, Sanded Background
Ink:  Elegant Eggplant Markers, So Saffron, Pear Pizzazz
Paper:  Pear Pizzazz, Elegant Eggplant, Whisper White, Riding Hood Red
Accessories:  Scallop Trim Border & Heart to Heart Punches

I'll go drop these off at the challenge sites and hopefully be back with another card.  I can't wait to show it to you.

Enjoy,
Bonnie

Wednesday, December 29, 2010

Combining Challenges

Hello Stampin' Friends.  Sorry I'm at this so late.  Seems like I've been burning up the phone lines today.  But it's always nice to have a chat with a friend or brother.

I'd like your opinion.  Which photo do you like the best?  This one......


or this one......


I tend to like the white background but I do so admire the photos with the colored backdrop.

This card uses the colors from the Color Challenge on SCS to use Night of Navy, Old Olive and Daffodil Delight.  I also used the sketch challenge on SCS today.

I decided to keep the white space but used different textures for the sections.

I inked the Very Vintage Large Wheel with Daffodil Delight and wheeled over the flower sections.  It gave it a very subtle pattern.

I used some faux flower soft in the center of the flower.  MrsBoz on SCS gave me the recipe.  Just rub 2 styrofoam balls together into a plastic bag and put a drop of re-inker in to color it.  Thanks for the tip Carroll Ann.

Card Recipe
Stamps:  Short & Sweet,Very Vintage Wheel
Ink:  Night of Navy, Daffodil Delight
Paper:  Whisper White, Night of Navy, Daffodil Delight, Old Olive
Accessories:  Big Shot, Square Lattice EF, Perfect Details Texturz Plate, Birds & Blooms Sizzlit, Word Window Punch, Faux Flower Soft

Don't forget to let me know if I should start using color in my backdrop.

Enjoy,
Bonnie

Wednesday, September 8, 2010

Friends Sketch

Now that I have my days straight, I got the sketch challenge done on the day! I haven't done that in a long time. You can see the sketch here. C'mon and play along!

I inked this little flower from the Friends Never Fade set with SU Markers and stamped then punched the corners. It was looking a little bare, (I think it was a bit small for the size of the square) so I used a clear mount block to guide in drawing a line all around. This always makes me nervous. You can probably see where I got the wobblies!

I used lots of Real Red here. I have some fall birthday girls who like red. I'll save this for one of them.

Card Recipe
Stamps: Friends Never Fade, Short & Sweet
Ink: SU Markers, Real Red, More Mustard, Always Artichoke
Paper: Whisper White, Real Red
Acc.: Scallop Trim Corner Punch, Big Shot, Square Lattice EF, Narrow Daffodil Delight ribbon

I'll be back with a card for the One Layer Wednesday challenge. I'm on a roll.

Later,
Bonnie

Tuesday, September 7, 2010

Window Garden

I did this card today for yesterday's CAS challenge to use a layout by resqbarbie and for today's Color Challenge on Splitcoaststampers.
Betty chose all In Colors this week, Concord Crush, Peach Parfait, & Pear Pizzazz. Have I said before that I love these colors? Dessert is to use string.

The Pocket Silhouette stamp set seemed perfect for these Fall colors. I stamped the flowers on a 3 1/8" square of Very Vanilla using all the colors. I tried to visualize it as a garden scene through a window. Judging from the angle it must be a basement window! Wouldn't it be wonderful to have a view like this?

After stamping, I cut the piece into 1 1/2" squares and adhered them to a 3 1/4" piece of Concord Crush.

The butterfly somehow got in the house and is trying to find his way out to the flowers! Did you notice the string body and antennae? It doesn't show up very well in this picture.

My first attempt at these squares are going to make a set of notecards. I need to go put them together.

Card Recipe (All Stampin' Up!)
Stamps: Pocket Silhouettes, Short & Sweet
Ink: Pear Pizzazz, Peach Parfait, Concord Crush
Paper: Pear Pizzazz, Very Vanilla, Concord Crush
Acc.: Big Shot, Square Lattice Embossing Folder, Beautiful Wings Embosslit, Word Window Punch, Linen Thread

Now over to SCS to post and look at all the wonderful inspiration in the galleries.

Hope this inspires you a bit.
Bonnie

Wednesday, August 11, 2010

Blackeyed Susan

When I was a little girl, we lived next to a meadow that was filled with wildflowers. My favorites were Blackeyed Susans. My Mom called me Susie, I don't know why, and she said I was her blackeyed Susie.

Memories! How nice!

I dug into my UFO (UnFinished Objects) box for the sketch challenge. I'm still trying to get to the bottom of that! I'll bet that I stamped 100 flowers from the Heartfelt Thanks set! I still have a bunch left.

The flower uses two-step stamping. I did the flower in Summer Sun and the stem & leaves in Garden Green. The center is stamped in Chocolate Chip. (I'm pretty sure these colors are right. It's been a while since I stamped them.)

I used Daffodil Delight for the base card. The sizes of the other elements can be found here on SCS.

I wanted lots of white, since I used a colored base and I'm really enjoying my embossing folders, so I embossed a piece of white with the Finial Press EF and another with the Square Lattice EF. All the sections are matted with Early Expresso. I stamped the wish from the Short & Sweet set, just inking the one word with the Early Expresso marker.

Card Recipe
Stamps: Heartfelt Thanks, Short & Sweet
Ink: Summer Sun, Garden Green, Early Expresso
Paper: Daffodil Delight, Early Expresso, Whisper White
Acc.: Scallop Trim Border Punch, Mat Pack, Paper Piercer, Big Shot, Finial Press & Square Lattice Embossing
Folders

Whew, it's really late. Luke is spending the night and it's been a long day. I think I'll leave you all and get some rest while I can.

'night,
Bonnie

Tuesday, August 3, 2010

Awash with Plaid

Hello stampin' friends. I tried the Technique Lovers Challenge on SCS this week. Sometimes it's too complicated as in cards that move. This week was to ink in plaid. It's really cool, don't you think?

You have to use a solid stamp. Ink it in the lightest color, then lay the edge of a contrasting ink pad on the stamp a few times with about 1/2" between. Repeat with another color ink pad with the darkest color. You can find complete directions here. Thank you Joan.

I used the Awash with Flowers stamp set and just used the filler stamps. I used Blushing Bride, Peach Parfait, and Pear Pizzazz for the tulip and So Saffron, Peach Parfait & Pear Pizzazz for the petals on the other flower. I cut the flowers out and adhered to the top note with dimensionals. I stamped the stems directly on the top note and used Pear Pizzazz, Wild Wasabi, & Soft Suede to plaid the leaves. They are also cut out and adhered with dimensionals.

I sponged some Peach & Pear around the edge of the top note with sponge daubers and doodled with the Pear Pizzazz marker. I dotted the center of the tulip with the Peach Parfait marker. A pearl from the retired Pretties kit finished off the design.

All is attached to a base card of Peach Parfait that has been embossed with the Square Lattice Embossing Folder.

I can use this for Mother Mark's Teapot Challenge this week too. These bloomers look like they are on a pinafore atop a smocked dress, if you use your imagination a bit. This challenge is all about imagination! You can read the story here.

Card Recipe
Stamps: Awash with Flowers, Short & Sweet
Paper: Peach Parfait, Whisper White
Ink: Blushing Bride, Peach Parfait, Pear Pizzazz, So Saffron, Whild Wasabi, Soft Suede
Acc.: Big Shot, Square Lattice Embossing Folder, Top Note Die, Pearl, Dimensionals

This card uses a lot of the In Colors. Did you notice? Aren't they delicious?

Hope you enjoyed seeing this technique. Now it's your turn.

Enjoy,
Bonnie

Monday, July 19, 2010

Chalk it Up

Here I am again. Still trying to catch up posts from last week's SCS challenges. Both of these are for the Ways to Use It challenge to use chalks.

This first card was a stamp from my UFO (UnFinished Objects) box. It had been stamped with black StazOn on watercolor paper. I used some makeup (eyeshadow I think) applicators to rub the chalk on. I think I used Real Red, Summer Sun & Garden Green. I can't be sure because I opened my chalks upside down once and they all fell out! Gasp! I had to guess at the colors when I put them back. Believe me, I am careful when I open it now. Hint...Make sure the picture is on top.

After I colored the flower(from the retired Touch of Nature set), I mounted it on Basic Black then adhered it to a Confetti White card base. I stamped the happiness (from Warm Words, also retired) with Basic Black.


For this next card, I did the Poppin' Pastels technique. I stamped the flourish from the Elements of Style set with VersaMark and used makeup applicators to apply the chalk to the stamped image. I did the same for the hummingbird on a scrap piece and cut him out. He is popped up on a dimensional. I used tiny pearls in the center of the flowers to carry on the soft look of this technique.

The design is mounted on Basic Black and the sentiment, from the Short & Sweet set, is stamped in Basic Black.

I think Poppin' Pastels is one of my favorite techniques.

Stay cool and try to get inky!
Bonnie

Thursday, June 24, 2010

Emboss, Emboss

Hello Stampin' Friends. First off I want to share a blog with you today. A lovely stampin' friend from the UK has started her own blog. It's called Cards for all Reasons. She does the most beautiful cards and pretty much sticks to the CAS style. I will put her blog on the side bar so you can access her readily.

Today's Ways to Use It challenge was to use heat embossing.

Embossing has never been my favorite technique, probably because I've not done it much and hate to drag all that stuff out. Now I keep my heat tool handy and it's not so bad. I still make a mess with the powder and seem to have it all over my work table when I'm finished. I'll have to work on that.
First card here is from a piece from the UFO (UnFinished Objects) box. I did have to break bad and ink up a stamp to do the background and the sentiment.

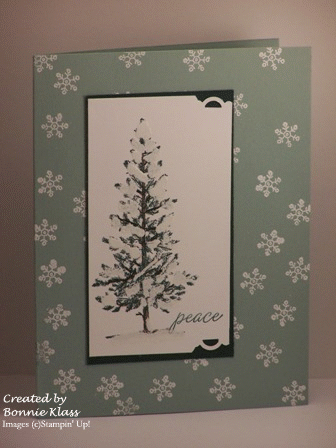
The tree was stamped in Handsome Hunter and I had used the Chocolate Chip marker to color the trunk. I used the VersaMark Pen on the branches and sprinkled the white Embossing Powder, heat set and voila! I had a snowy tree! The tree is matted on Handsome Hunter. The punching is a little funky because I used the punch in the corners and didn't like it. I cut off the corner & outside scallop. It gives it a little different look and I liked it.

I created a snow storm on the card by inking the little snowflake from the Short & Sweet set with VersaMark and embossing all those snowflakes. I used the soon to retire, Sage Shadow, for the card base. The sentiment is part of a stamp from an old Christmas set, To You & Yours. Snowy trees always make me feel peaceful.

While I was working on the tree card, I kept thinking Emboss Resist. I had seen so many beautiful cards done with this technique and had always thought I would try it but didn't. I have a goal to only use stuff from the UFO box and I had these flowers stamped from the Eastern Blooms stamp set. Since I needed a card base for them, I figured it would be ok to ink up the branch from the same set and do an emboss resist with it. Boy am I glad I did. I really love how it turned out.

I inked the branch with VersaMark and stamped it randomly on a white card. I sprinkled a good coat of White Embossing Powder on the card (and on the table, oh my!) then heat set it. The hardest part of heat setting such a large area is to make sure all of it is set before you stop. I let it cool a bit then sponged Certainly Celery and Baja Breeze (new color) ink all over the card. When I was finished, I took a paper towel and wiped off the branches. The ink doesn't stick to the embossing!

I found this darling center for the big flower in my gem box. I have no idea where it came from. A big pearl would do too. By the way, the large flower is punched with the 5-Petal Flower Punch. I used textured Pacific Point (new color) & Certainly Celery behind the flowers. The sentiment is from the Level 1 Hostess gift I showed you a couple of posts back. It's called Because I Care.

I'm glad I tried this technique. It was really fun to see the colors emerging and I love the effect. I'll surely do it again.

Don't forget to check out Sally's blog.

Hugs to all,
Bonnie