Monday, January 31, 2011

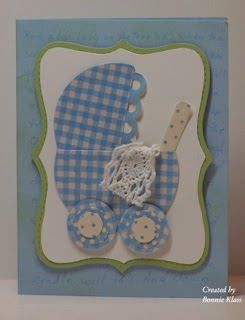
Rock and Roll

Today's CAS Challenge  at SCS is to do a card with a Rock & Roll theme!  I'm really out of touch with Rock & Roll music, so I was thinking I could  use the rock & roll technique for inking up a stamp.  Then our youngest daughter (Luke's Mommy) called with news from the ultrasound.  Did I tell you she was expecting in July?

Well, it really hit home that once this baby comes, we're going to be doing some rockin' & rollin'!


Can you guess what they think the ultrasound shows?  (Ruthann & Sarah, don't let on that you know, ok?)

I had some of this paper left in my stash.  I know it's not Stampin' Up! but I've gotta use what's handy.

I used the 2 1/2" Circle Punch, punched 2, and used my paper cutter to trim the tops off.  Then I used the 1", 3/4" & 1/2" Circle Punches for the wheels.

When my friend gave me the paper, she also gave me a sheet of decorative strips to match.  I trimmed some of those for the scallop trim and the handle.  I also cut the circles for the wheels out of the trim.  A tiny scrap of lace tucks into the carriage for a blanket.

I used the BIG GUY and the Top Note Die for the background.  The white one is trimmed at the perforations.

Then, I was really brave!  I used a Stamp & Write Marker and wrote the words to Rock-a-bye Baby on the card base.

So you see this card Rocks and Rolls!

Card Recipe
Stamps:  None
Ink:  Bashful Blue SU Marker
Paper:  Bashful Blue, Certainly Celery, Whisper White, DP from my stash
Accessories:   2 1/2", 1", 3/4", & 1/2" Circle Punches, Lace, Big Shot, Top Note Die

We had a great time at Emmy's birthday party yesterday.  She loved opening presents and eating cake.  It was kind of wild with an excited 2 yr. old Birthday Girl and her 6 cousins!  But it was so much fun!

Enjoy,
Bonnie

Sunday, January 30, 2011

CASEing Tillymint

This card is for all of you who visit my blog and SCS gallery.  Sharing my cards with you brings so much more happiness than just creating them.

I had a little time this morning and I checked out the Featured Stamper at SCS.  This week the honors go to Tillymint (aka Sue).  I would like to CASE several of her cards if only I had the time!  What an enjoyable gallery.  I chose this card to CASE first.

Here is what I came up with......


I really didn't change much.

I loved the single pink flower in Sue's card so I stayed with that although I used a different flower and mine is stamped then watercolored.  (This time I colored with a blender pen and ink. Much more control that way!)  I did use a narrow mat behind my image and another scrap of white behind that instead of scoring.

I used another piece of the stiff insert from DSP as a card base.  It is a better match to the shimmery white that I stamped and colored on. I punched the same lacy edge as Sue did and changed the sentiment.

Card Recipe
Stamps:  Happiness Shared
Ink:  Black StazOn, Melon Mambo, Pear Pizzazz
Paper:  Shimmery White, Melon Mambo
Accessories:  Eyelet Border Punch

I'm off to celebrate our Emmy's 2nd birthday.  My but time flies!  Here she is at 2.


She's already starting to look like a big girl!

Enjoy,
Bonnie

Saturday, January 29, 2011

Happiness Shared

If you've been reading my blog, you know that I really want to do watercoloring....good watercoloring!  I do watercolor, but I still can't seem to control the amount of water.  Either I have the brush too dry and get too much color or it's too wet and goes all over!  Here's my latest attempt.


I actually took a close up to share, but when I looked at it in my photo program, I decided not to.  Have you noticed that photos can show up mistakes that you haven't even noticed until you look at the picture?  I think I need some lessons on photography as well as watercoloring!  At least I have fun and that's the main thing isn't it!

I used the colors from the ColorQ #69 challenge


I went a little heavier to the Peach & Cajun than I intended.  A lot of that is a control issue!

The Free 4 All challenge on SCS was to use warm colors and something fuzzy.  These colors certainly are warm and I made some Peach Parfait faux flower soft to put in the center of the flower.

A little tip here. I stamped the image on shimmery white.  When getting ready to mount the design to the card I realized that it is too dark for Whisper White and too light for Very Vanilla.  Neither looked right.  I had some of the stiff insert from my DSP that I had cut for card bases.  I found that this was a good match for the Shimmery White.  It's not shimmery but the shade of white is the same.  I love it when I can use up those bits & pieces that hang around!

Card Recipe
Stamps:  Happiness Shared
Ink:  Black StazOn
Paper:  Shimmery White, Cajun Craze, Insert from DSP
Accessories:  Reinker (Peach Parfait, Cajun Craze, Rich Razzleberry, Crumb Cake), Aquapainter, Big Shot, Elegant Lines EF, Kraft taffeta ribbon

I need to get this into the challenges.  Remember that Baroque Valentie a few days ago?  By the time I got over to the challenge site, it had closed.  Sniff, sniff.

Enjoy,
Bonnie

Friday, January 28, 2011

Nature's Inspiration

In case  you haven't noticed, I love flowers, trees, butterflies....pretty much all things nature.  What a wonderful world God has made for us to enjoy!


Jennifer Styles is hosting this week's OLW challenge and she gave us a sketch to use.  It goes without saying that the card has to be one layer with minimum or no embellishments.  Here is the sketch she gave us to work with.


I reversed the sketch.  It just seemed to work better for me backwards.  There is so much inspiration in this gallery each week.  I hope you get a chance to check it out.  Just click on the link above.

And yesterday, when I saw the Just Add Ink #53 challenge, this card just fit.  Here's the inspiration picture....


Isn't that the most beautiful, happy picture?  My flowers aren't as bright though I think they work for this challenge.

Card Recipe
Stamps:  Inspired by Nature, Dreams du Jour, Happy Harmony
Ink:  StazOn Black, Marina Mist, Pacific Point, Basic Gray, SU Markers (Daffodil Delight, More Mustard, Old Olive, Soft Suede)
Paper:  Watercolor
Accessories:  Blender Pen

I used the small flower and the edge of the grass on this stamp inking the flowers with markers and "thumping" with a darker color marker before stamping.  I colored the butterflies with a blender pen and ink.

Enjoy,
Bonnie

Thursday, January 27, 2011

Field of Butterflies


This card kind of made itself!  I love it when I don't have to think and think and try and mess up and throw away!  Now, I'm not going to say I didn't do any of that today, but not on this card!

The finished size of this card is 3" x 6"  I rarely make a card this size, but Mercy's card had the long narrow look and it was fun to do a different size card.  Stampin' Up! offers open end envelopes that fit this size.

I was able to make use of some scraps from my scrap bags and some of my never ending stash of butterflies.

Card Recipe
Stamps:  Bird on a Branch
Ink:  Basic Black
Paper:  Textured Whisper White, Basic Black, Whisper White
Accessories:  Big Shot, Beautiful Wings Embosslit.

Enjoy,
Bonnie

Wednesday, January 26, 2011

Baroque and Hearts

I love this flourish from the Baroque Motifs set.  It's especially striking in black.  If it doesn't stamp evenly, you can fix it easily with a Basic Black SU marker too!


I used this sketch from the Just Add Ink challenge this week.


And the Stampin' Up! Only challenge #11 is to do a Valentine.


The hearts are punched from embossed scraps of Cherry Cobbler with the Heart to Heart punch.  The flap is a Top Note cut down a bit.  And I love the Seam Binding for bows!  It ties so easily and it's not bulky at all.

I could easily stamp Love in the bottom left corner, but I kinda like it without anything.  I'll just let the hearts do the talking!

Card Recipe
Stamps:  Baroque Motifs
Ink:  Basic Black
Paper:  Whisper White, Basic Black, Cherry Cobbler
Accessories:  Heart to Heart & Corner Rounder Punches, Big Shot, Top Note Die, Square Lattice & Finial Press EFs, Cherry Cobbler Seam Binding

Only one card today.  I was able to go to the Norman Rockwell exhibit at the Art Gallery so I didn't get any card making in.  The exhibit was outstanding and I found a painting there that had hung in a restaurant in my hometown when I was growing up!  How fun!

Enjoy,
Bonnie

Tuesday, January 25, 2011

Sale-a-bration Bliss

In honor of Sale-a-bration, here's another quick card.


This is from the Sale-a-bration set that I pre-ordered.  It's called Bliss.  I loved this filigree and it was perfect for the Color Challenge on SCS today.

When I saw the colors, Soft Suede (not a favorite), Elegant Eggplant & Riding Hood Red, I was a bit dismayed.  I've been thinking I'd like to brighten up my cards a bit and this was not working into my plans!

I was trying to figure out how I could use this set and all these colors and I had a Eureka! moment.  Markers, filigree and subtle coloring.

So if you look close all the colors are on there.  I used Whisper White & Crumb Cake for my neutrals and I'm quite pleased with it.

Card Recipe
Stamps:  Bliss
Ink:  Su Markers (Soft Suede, Elegant Eggplant, Riding Hood Red)
Paper:  Crumb Cake, Whisper White, Elegant Eggplant
Accessories:  Big Shot, Square Lattice EF, Scallop Edge Border Punch

And just a couple of notes here.  I neglected to mention my blogging friend Brenda (Benzi Stampz) who is also on the Design Team of Stampin' B's.  You can find a link to her blog on my sidebar.

And Chrissie of Simply One of a Kind, honored me today with the Stylish Blogger Award! Thank you so much Chrissie!  (You can link to her blog from the sidebar too.)

Stampin' Friends are the best!

Enjoy,
Bonnie

It's Sale-a-bration Time


Now's the time to order all those Stampin' Up! things that you've been wanting!  Or if you've been thinking of becoming a
  Stampin' Up! Demonstrator, there's no better time. 
Email me or visit my website.


Click here to see the free sets available

Enjoy,
Bonnie

Monday, January 24, 2011

Bird in the Wreath?

I wanted to share the other card I made yesterday.  It's one that I really struggled with but finally came to a satisfactory conclusion.  Sometimes cards come so easy and other times they are a mighty struggle!


A couple of my blogging friends are on design teams and I've been wanting to play along with their challenges.  Unfortunately time is limited and I don't always often get to everything that I want to.

Colleen (of Dietrich Designs) is a Designer at The Play Date Cafe.  This was this weeks challenge there....


I think I should have used the Olive Green and maybe I would have liked it better, but somehow I got Always Artichoke in my mind and went with that.

My friend Emily (My Little Slice of Bliss) is a Designer on Stampin' B's Designs and she challenged us to use a banner on our card.

The wreath is the branch from the Extra Large 2-Step Bird Punch.  I found that punching the leaves with just a bit of the branch worked best.  I used a 2 1/2" punched circle with a 1 3/8" circle punched out of the middle as a base.   When I had enough branches punched, I ran the snail over the base and began to stick the branches down. I tried not to adhere all the leaves so I could tuck the next branch underneath.

Once the wreath was finished I needed a door and the Faux Wood Technique seemed like the best choice, especially since I needed gray in my card. I used Going Gray on a 4" x 5 1/4" piece of Whisper White to do this.  After I scored the piece, I just dragged the inkpad down the length of the card a couple of times.

For the banner, I stamped the Welcome on a scrap and cut the ends.  It needed some defination, so I inked the edges with Basic Gray.  I used 2 dimensionals, one on top of the other in the middle and snail on the ends to attach it.

Card Recipe
Stamps:  Punch Potpourri, Warm Words
Ink: Going Gray, Tangerine Tango, Basic Gray
Paper:  Basic Gray, Whisper White, Always Artichoke
Accessories:  Extra Large 2-Step Bird Punch, Basic Pearls

I haven't had a chance to stamp today.  I've got an idea floating around in my head too.  I hope to get to my table and play a bit this evening.

You can check on my sidebar for Colleen's & Emily's blogs.  Treat yourself to a visit.

Enjoy,
Bonnie

CASEing Em

I really tried to get to the Featured Stamper card on SCS yesterday!  When I saw artsy_em's gallery, one time through wasn't enough.  I spent so much time enjoying her gallery, that the day was about gone!  I did get the card done last night.  But it was so late, I didn't take the time to post.  This is the card I CASEd.

 
I used a different stamp and butterfly but kept the colors and layout the same.  I chose not to sponge around the edges and keep it clean & simple.

I bought this stamp, Elizabeth, a while back and had never used it.  I think I will be using it a lot now that I tried it out!  Did you know that you can get this stamp free during Sale-a-bration?  For every $50.00 in merchandise that you purchase from now until March 31st, you can get a free stamp set or even select embellishments.  If you would like a Sale-a-bration Catalog, let me know and I will mail you one.

I stamped it twice, once on a scrap.  I stamped the sentiment in the oval on the scrap and cut it out so it could be popped up!

A little hint for those of you who, like me, can't stamp straight and have to "eyeball" stuff.  I started the main image on a piece of WW a little bit bigger than what I needed so that I could get it centered when I trimmed it up.

My butterfly was in my box of left overs.  I didn't have any twine that would work for the body.  I love the way Emily twisted and tied the twine on hers!  I used some of the black seed beeds left over from my jewelry making days.

If I had the time, I could CASE several more of her cards.  Lots of inspiration in her gallery.

Card Recipe
Stamps:  Elizabeth, Because I Care
Ink:  Black StazOn, Cherry Cobbler
Paper:  Basic Black, Whisper White, Cherry Cobbler
Accessories:  Big Shot, Beautiful Wings Embosslit, Black Seed Beads

Enjoy,
Bonnie

Sunday, January 23, 2011

Thank You Colleen

A couple of weeks ago I had a very nice surprse!


My blogging friend Colleen, of  Dietrich Designs gave me this award.  I am so honored.  Thank  you Colleen!
             
By accepting this award I have to:

           1.  Thank and link back to the person who gave you this award.

           2.  Share 8 things about yourself

           3.  Pass it on to 8 bloggers

           4.  Contact those bloggers and tell them about their award


Sorry it's taken so long to post this.  Trouble is, I'm having trouble thinking of 8 things about myself that would be of interest to anyone!  I'll give it a try though.

1.  I was born and raised in VT but have lived in NC much longer than I did in VT.

2.  I love NC snow; it doesn't last until Spring.

3.  I love a pretty yard but hate yard work.  (I'd much rather make cards.)

4.  I am a full time nanny to our grandson Luke (almost 3) and there will be another little one joining him in July.

5.   We're hoping to move soon and that move will be out last.

6.   I used to sew, knit, crochet, cross stitch, needlepoint, and just about any craft you could think of.

7.   Now my girls shop on Etsy.com to get handmade stuff.  (I do provide them with lots of cards though.)

8.  I have gray hair, not blonde.

I don't know how interesting that is, but there you have it.

I've noticed this past week that nearly everyone that I would pass this on to has already received it.  So I'm going to do as my friend Susan did and add some of my favorite blogs to the sidebar.

Now to go finish a card....

Enjoy,
Bonnie

Saturday, January 22, 2011

Hydrangea Sketch

Here is the card that I did for the Sketch Challenge on SCS this week.


I love this sketch, mainly because it is pretty clean and neat.  Did you notice that I actually used some Decorative Paper?  I am going to try to use more of that paper that I love in the packages but then I break out in a sweat when I try to put it on a card!

Here is the sketch....


I didn't add layer 4.  The row of tiny flowers with pearl centers takes it's place.

The flower was stamped with Concord Crush on a tag that I found in my stash.  I used the blender pen and a bit more ink to color the flowers.  The stem and leaves are stamped in Old Olive.  The Color Spritzer Tool with my Concord Crush Marker along with some sponging in Pear Pizzazz softened the background.

I rounded 3 corners & used the decorative corner punch on the 4th.

The Decorative Paper is from the Paper Pack that is a Level 1 Hostess gift.

All the layers have a narrow mat of Concord Crush.

Card Recipe
Stamps:  Because I Care
Ink:  Concord Crush, Old Olive, Pear Pizzazz
Paper:  Very Vanilla, Concord Crush, Designer Series Paper Pack
Accessories:  Blender Pen, Corner Rounder & Scallop Trim Corner Punches, Color Spritzer Tool, Concord Crush SU Marker, Stamping Sponges, Basic Pearls

Enjoy,
Bonnie
Greenhouse Poppy

Happy weekend, Stamping Friends. 

I've got a couple of cards  that I made this week that I would like to share with you.


This is the card I did for the ColorQ 68 Challenge


Isn't that plate gorgeous?

I just got my Greenhouse Garden set back from my DD and thought it would be perfect for this challenge.  Could it be that this flower is almost identical to the one on the plate?  Not very imaginative I know, but why mess with something this nice?

I stamped the full flower in Poppy Parade on Whisper White then did the outline in Cherry Cobbler.  I used Artichoke for the stem and a So Saffron Marker to color the center of the flower.

Then to simulate watercoloring, I used the Aqua Painter and a drop of So Saffron re-inker to do a soft outline around the flower.

Once everything was dry, I used the BIG GUY and the Square Lattice Embossing Folder on the whole piece.

Simple layering with a  bit of So Saffron grosgrain ribbon finished the card front.

Card Recipe
Stamps:  Greenhouse Garden
Ink:  Poppy Parade, Cherry Cobbler, Always Artichoke
Paper:  Whisper White, Cherry Cobbler
Accessories:  So Saffron grosgrain ribbon, Big Shot, Square Lattice EF

Enjoy,
Bonnie

Friday, January 21, 2011

Many Thanks

Ok, I'm going to post this.  It's the 3rd and last try.  You know, a one layer card is sometimes a real challenge! 

By the way, the One Layer Wednesday Challenge is over at Simplicity and it's to stamp more than one sentiment on a one layer card.  NO IMAGES ALLOWED!


You see I have this problem.  I can't stamp straight!  Susan suggested a stamp positioner but I'm embarassed to tell you that I can even get a crooked sentiment with that!

So, right off to bat I thought I'd have to stamp randomly.

The first one got a smudge.  I covered the smudge with flourishes, but then it didn't fit the challenge!


The second one had a smudged "h" in one of the thanks.  That one is in the trash can!

I do think this would be a great card to give to our neighbor the next time he blows the leaves or pulls my trash can up.

All the stamps are SU.  There are just too many sets to list.

When I look at the gallery this week, I am amazed.  There are so many talented stampers and creative cards!

Enjoy,
Bonnie

Thursday, January 20, 2011

Breezy Baha


The color challenge on SCS this week is to use Baja Breeze, Pear Pizzazz & Bravo Burgundy.  While Baja & Pear are among my favorite colors, Bravo Burgundy rates way down there with Basic Gray.

It worked very well for this birdcage from the Nature Walk set that's now available in the Occasions Mini catalog.

I used the flower from this set and inked it with markers and stamped several times before re-inking.  I turned the stamp a bit each time to simulate the flowers blowing in the breeze.  Dessert this week is to be able to use "Bravo",  "Pizzazz", or "Breezes" as a description for our card.  Mine is breezy.  I could also use Bravo for using Burgundy!

One of the birds from the Clearly for You set (also in the Occasions Mini), inked in Baja, is stamped "in" the bird cage with the help of the Stamp-a-ma-jig.

I used a favorite CAS layout for this.  I seem to be stuck on this layout this week but it keeps on pleasing me.

Card Recipe
Stamps:  Nature Walk, Clearly for You
Ink:  Bravo Burgundy, SU Markers (Baja Breeze, Pear Pizzazz)
Paper:  Pear Pizzazz, Whisper White, Bravo Burgundy
Accessories: Silver Elastic Thread, Basic Rhinestone

I really appreciate all the comments you have been leaving. They mean so much!

Enjoy,
Bonnie

Wednesday, January 19, 2011

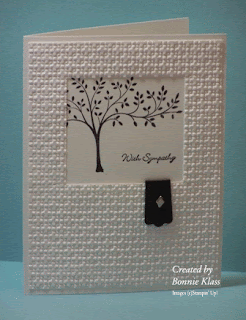
Thoughts Framed

Sunday's Featured Stamper on SCS was whoistracy.  Splitcoast was having some issues Sunday and I couldn't even bring up many of the cards in her gallery.  This one was one that I saw and I woke up Monday morning thinking about it.  I love the cutout frame and the way she did the ribbon.


If you've taken a look at her card, you can see how far off I am from her beauty.

I wanted to do something a bit different than the leaves, maybe butterflies, but then I got sidetracked by the Technique Challenge, also on SCS, to use a silhouette stamp.

Then I couldn't find a ribbon that worked.  Tracy's ribbon was so light and airy.  All I have in black is heavy and not at all right.  So I used the Modern Label punch and folded it over the frame instead of ribbon.

So there is really not a lot of similarity between this card and Tracy's.  But I did use the frame idea!

Maybe I'll try it again using butterflies.

At least I have another Sympathy card for my stash.

Card Recipe
Stamps:  Thoughts & Prayers, Teeny, Tiny Wishes
Ink:  StazOn Black
Paper:  Whisper White, Basic Black
Accessories:  Big Shot, Square Lattice EF, Modern Label Punch, Metallic brad (It's SU but from an old set)

Enjoy,
Bonnie

Whacked Embossing Folder

I have had so many questions about my "Whacked" Finial Press Embossing Folder, that I decided it deserved a post all it's own.


Here is what it looks like.

My favorite is the skinny one in the middle.  I used it on the cards I showed you the past two days.

It's simple really.
  •  Look at the folder and decide where you want to cut. 
  • You can use a fine point Sharpie and draw your lines.
  • Cut along the lines with a pair of sharp scissors. (I used SU Craft & Rubber Scissors.)  
I first saw this on Sandi MacIver's blog.  Just scroll down a bit on the page that is linked here.

I bought another Finial Press EF so I'd have the whole one, but I think I use the "whacked" one more!

If you scroll down and look on the sidebar, there is a label for Whacked Embossing Folder.  You can see the cards where I used it.

Enjoy,
Bonnie

Tuesday, January 18, 2011

Clearly Blissful

This card was inspired by a card I saw on My Paper Secret blog.  Cristina is so talented and I always love seeing what she has come up with.  I loved her card with the punched out heart and wanted to give it a try.

This is what I came up with.....


I wanted to do card for  Just Add Ink #51  to Just Add Monochrome and this layout just fit in with that challenge.

I used my Full Heart Punch on the bottom third of a 4" x 5 1/4" piece of Whisper White.  Because I was chicken about getting the design lined up just right under the heart, I stamped the flourish on a scrap piece of Whisper White and adhered it to the card base under the cut out.  This flourish is a sneak peek from the SALE-A-BRATION catalog.  You can get this set, Bliss, free with a $50.00 purchase.  But you have to wait 7 more days!  Being able to pre-order these sets is one advantage of being a Stampin' Up! Demonstrator!

I used the whacked Finial Press Embossing Folder across the top again.  You may remember I used this on a card that I posted yesterday.  I also punched the little heart from an embossed piece.

The front piece is attached to the Whisper White card base with dimensionals.

Card Recipe
Stamps:  Clearly for You, Bliss
Ink:  Cherry Cobbler
Paper:  Whisper White
Accessories:  Full Heart & Heart to Heart Punches, Big Shot, Whacked Finial Press & Square Lattice EFs, Cherry Cobbler Seam Binding, Basic Pearl

Thank you Cristina for the wonderful inspiration for this card!

Enjoy,
Bonnie

Bookmark Card

While playing with Poppy Parade  in the last week, I made a bookmark using the Punch Potpourri heart and the Scalloped Heart of Heart embosslit.


I love to read and most of my friends and family also love to read.  I love being able to pass along or use a new bookmark.

A few weeks ago, on SCS there was a Technique challenge to make a bookmark using ribbon.  I didn't have time to do one then, but when I saw these heart pieces sitting on my table, I knew just what to do with them.

Attaching the bookmark to a card posed a challenge.  I ended up just tying the ribbon around the front of the card.  I will need to hand it to someone rather than mail it, but I really don't mind that.

Oh, and the flowers were colored by using a blender pen and some Poppy Parade ink.

I'm going to enter this in the Stampin' Bs #93 challenge to use a die cut.  There are a lot of awesome cards over there!  Pop on over and take a look.

Card Recipe

Stamps: Punch Potpourri
Ink: Poppy Parade
Paper: Whisper White
Accessories: Full Heart Punch, Big Shot, Elegant Bouquet EF, Scalloped Heart of Heart Embosslit, Poppy Parade Ribbon

Enjoy,
Bonnie

Monday, January 17, 2011

Inspired by Cindy B

Today's CAS102 challenge at SCS is to do a card inspired by cindybstampin's card here.


I've probably made more than enough Valentine cards, but this just seemed to fit the challenge.

After stamping the Punch Potpourri heart and letting the ink dry, I used a blender pen and ink to color the flowers in the heart.  The little hearts are punched out of a piece of Real Red embossed with the Square Lattice Embossing Folder.  The Scalloped Heart of Hearts Embosslit is a perfect mat for the punched design.

Card Recipe
Stamps:  Punch Potpourri, Teeny, Tiny Words
Ink:  Basic Black, Real Red, Old Olive
Paper: Whisper White, Real Red
Accessories:  Big Shot, Scalloped Heart of Hearts Embosslit, Square Lattice EF, Whacked Finial Press EF, Full Heart, Small Heart & Heart to Heart Punches, Real Red narrow ribbon, Blender Pen, Basic Pearls

Enjoy,
Bonnie

Elements of Poppy

Ok, here's the other card I promised you.


I stamped another scrap of Vanilla with the Elements of Style stamp in So Saffron ink and used the Simple Flower Embosslit with the BIG GUY.  For the center I used some of the embossed So Saffron scrap and punched a 1/2" circle.  The stem is from the Three Little Words set.

The colors are again from the Color Dare Challenge 92.  This layout is much more pleasing to me.  The previous card has a bit more Poppy than is soothing.

The layout is from the Stamping 411 Saturday Sketch Challenge 186.  I really love this layout and the torn edge adds some extra texture.  I rarely think about tearing an edge.

Instead of a button, I  made a little bow with some So Saffron ribbon and Linen Thread.  I think it will go through the mail with no problem.

Card Recipe
Stamps:  Elements of Style, Three Little Words
Ink:  So Saffron, Soft Suede
Paper:  So Saffron, Very Vanilla, Poppy Parade
Accessories:  Big Shot, Simple Flower Embosslit, Square Lattice EF, So Saffron grosgrain ribbon, 1/2" Circle Punch

Enjoy,
Bonnie

Punched Blossom Petals

Hello Stampin' Friends.  I hope you had a great weekend and that it was a long one for most of you.  Maybe you had some extra time to get some stamping in!


This is a card I made at Stamp & Share on Saturday.  I wanted to try out my new Blossom Petals punch.  First I stamped some scrap cardstock with Elements of style in So Saffron ink and punched the medium petal several times.  Using my bone folder, I curved the petals a bit.  I punched a 3/4" circle to adhere the ends of the petals to and stuck them all down.

I didn't particularly like it!  But somehow it got flipped over and I liked the Vanilla side better.  I thought it looked like a Lotus flower, but I've never really seen a Lotus flower.  My friend said it looked like a Dahlia to her.  So we're calling it a Dahlia!  Oh, the 3/4" circle on the top of the flower was punched from an embossed scrap of So Saffron.

The colors are from the Color Dare 92 challenge to use Poppy Parade, So Saffron & Very Vanilla.

The layout is from the clean&simple blog FTL123.  I chose not to put a sentiment on it yet.  I'll wait and see what occasion it will be going for.

Card Recipe
Stamps:  None at all
Ink:  So Saffron on the back of the flower (does that count?)
Paper:  Very Vanilla, Poppy Parade, So Saffron
Accessories:  Blossom Petals Punch, Scallop Trim Border Punch, 3/4" Circle Punch, Poppy Parade Ribbon

I did find out that when using the Blossom Petals Punch, it works better to punch narrow strips to minimize waste.

I did another card with these colors that I like much better.  After I drop this off at the Clean&Simple blog, I'll come back and share the other one.

Enjoy,
Bonnie

Sunday, January 16, 2011

Sharing

Our cardmaking groups are finished for the month.  This is one of the samples that I shared.


This is a quick and simple card and uses some of that DSP I've collected.  I declare, if I never buy any more paper, I will never run out!

This paper has sparkle on it.  I don't think the picture shows it up at all.  It really is lovely paper!

The ribbon is from the Clearance Rack at SU.  It's polka dot on the other side.

The little punched hearts hide a smudge.  I like it better with the hearts so I'm glad I smudged.

The sentiment is very old but so perfect for Valentines and such.

Card Recipe
Stamps:  Wonderful Words
Ink:  Real Red
Paper:  Whisper White, DSP (last year's)
Accessories:  Scallop Trim Border Punch, Small Heart Punch, Ribbon, gems


Here are a few of the other cards I shared or made at these events.

Enjoy,
Bonnie 

Friday, January 14, 2011

Emboss, Emboss, Emboss

I love Cherry Cobbler! The edible kind yes, but the SU color is so rich and well, red.  Deep, delicious red. And I think it compliments this design piece that I found in my UFO box.


This flower was from a Stamp Stack a few months ago and though it wasn't a perfect stamping, it held possiblilty.

I touched up the flower a bit with a blender pen & ink and then embossed it with the Square Lattice Embossing Folder to hide the rest of the imperfections.

I used the sketch challenge from SCS this week for the layout.


I stamped the #1 panel with En Francais background stamp in Cherry Cobbler.  The #3 panel is embossed with the Vintage Wallpaper Embossing Folder.  It was a scrap piece and a perfect fit!  And the #2 panel is embossed with my whacked Finial Press Embossing Folder.

Having 3 Embossed panels qualifies it for the Free For All Challenge, also at SCS to use at least 2 embossing folders for texture.

I love it when I can use up some of my leftovers that are taking up far too much space!  Trouble is that I keep adding to the pile at a higher rate than I use.

Card Recipe
Stamps:  Apple Blossoms (Level 2 Hostess set), En Francais
Ink:  Melon Mambo, Pear Pizzazz
Paper:  Cherry Cobbler, Whisper White
Accessories:  Vintage Wallpaper, Square Lattice, Whacked Finial Press EFs, Cherry Cobbler Seam Binding, Basic Pearl

Enjoy,
Bonnie

One Layer Trees


My favorite set, Lovely as a Tree came through for me again.  I had a request for some masculine cards, mainly get well or sympathy.


Then when I saw the One Layer Wednesday challenge was to use a bare tree, everything came together.

 Jennifer was very specific about not having any leaves, flowers, needles, nada.  Just a plain tree.  Well this stamp has several plain trees.  I don't know if having more than one will count against me or not.  It is a one layer card with no embellishments.

I scored a frame around the trees then used the Basic Black Marker over the scoring.  To do it again, I wouldn't bother with the scoring.  I'd just outline it.

I also did one on River Rock.


I think this one could be used as a get well card or a sympathy card.

I stamped the trees on both cards with VersaMark and embossed them with Black Embossing Powder.  I embossed the sentiments too.

Card Recipe
Stamps:  Lovely as a Tree, Close a Memory (card 1), Sincere Salutations (card 2)
Ink:  VersaMark
Paper:  Crumb Cake (card 1), River Rock (card 2)
Accessories:  Black Embossing Powder

Enjoy,
Bonnie

Thursday, January 13, 2011

Quadruplets?

Or a well dressed baby!


The ColorQ Challenge this week has some bright and pretty colors.


Then when I saw the SU-Only challenge to make a baby card, I knew just what I wanted to do.

I bought the Baby Tees wheel a while back because I didn't have any baby stamps and thought this would work well.  It did after some practice.  It was a bit of a challenge to get the right pressure on the wheel to get a good clear print.

Then, since I needed one each of 4 colors, I rolled off a line of each color. 

Then I had to do some cutting.

The hangers were really a challenge!

I gave up trying to keep them intact and cut some from the tees that didn't stamp well.

I dyed some white grosgrain ribbon by dragging it over the Tangerine Tango ink pad while holding it with a piece of Stampn' Sponge.  I had to pull it through a few times but once it dried, it looked pretty good.  

This card is 3" x 6".  I very seldom make a card this size but I needed the length to fit all the tees on it.  I think it's the perfect size to hold a gift card or some paper money.  (Isn't any card perfect to hold a gift card or money?) 

Card Recipe
Stamps:  Baby Tees Wheel
Ink: Taken with Teal, Kiwi Kiss, Melon Mambo, Tangerine Tango
Paper:  Kiwi Kiss Textured, Whisper White
Accessories:  Big Shot, Perfect Polka Dots EF, Dyed grosgrain ribbon

Enjoy,
Bonnie

Wednesday, January 12, 2011

Riding Hood Valentine

I stamped this bird from the Punch Potpourri set last Saturday, added ribbon and just didn't like it.  So I came home, cut the bird out, pulled the ribbon off, and this is what I turned up with.


I like it much better!

I did some fancy work on the white strip and punched a couple of hearts from an embossed piece.  The wing is cut from one of the hearts in the I {heart} Hearts set that I stamped in Riding Hood Red.

All of this was so I could use some of this wide ribbon I bought from the SU Clearance a while back!

I'm going to enter it in the PaperPlayer29 challenge Valentine's Day.

Card Recipe
Stamps:  Punch Potpourri, I {heart} Hearts
Ink:  Riding Hood Red
Paper:  Riding Hood Red, Whisper White, Old Olive
Accessories:  Riding Hood Red wide striped ribbon, Extra Large 2-step Bird , Heart to Heart & Scallop Trim Border punches, Basic Pearls

Enjoy,
Bonnie

Tuesday, January 11, 2011

In the Pinks

I love the Hydrangea stamp in the Because I Care (Level 1 Hostess gift) and I haven't played with it in quite a while.  So I got it out and played with it a bit today.


I used the sketch from Stamping411's Saturday Sketch Challenge #185


Here's the sketch

When I saw the colors for the Color Challenge on SCS today to use Pretty in Pink, Cherry Cobbler & Melon Mambo with a neutral of choice, this card came together for me.

I inked the flower head with my Pretty in Pink SU Marker and used the Thumping Technique to add Melon Mambo. I inked the stem with my Crumb Cake marker.  It took a few tries before I got an image that I liked.  If you try this, you may want to practice on scratch paper first.

I masked off the top portion of the card and sponged all three colors on the bottom section.

Something I discovered while doing this card.  Sometimes there are areas of the flower head that don't stamp evenly.  There is a single flower stamp in this set and by inking and thumping it I could stamp it in the "weak" places and it filled in perfectly!

Card Recipe
Stamps:  Because I Care
Ink:  Pretty in Pink, Melon Mambo, Cherry Cobbler, SU Markers of same colors + Crumb Cake
Paper:  Whisper White, Cherry Cobbler
Accessories:  Corner Rounder Punch, Cherry Cobbler Seam Binding

Enjoy,
Bonnie

Another Day in the Snow

There was a card in my UFO box.  It was white trees stamped on Night of Navy.  Pretty, but boring so it had to stay in the box without a real home.

This morning, when I saw it, I had a thought.

And it turned into this.....


I cut the trees off the card and layered it.  I even used a bit of glue and Dazzling Diamonds on the trees.  They really shimmer IRL.  Kind of like the trees outside today.

The trees have a home and I have another guy Birthday card for one of those winter birthdays.

Card Recipe
Stamps:  Lovely as a Tree, Teeny, Tiny Wishes
Ink:  Whisper White, Night of Navy
Paper:  Textured Whisper White, Textured Night of Navy
Accessories:  Dazzling Diamonds, Word Window Punch

We didn't get much snow, just enough sleet to cover the ground and freezing rain to make the roads slick.  I'm thankful we didn't have to go out in it!

Be back in a bit.  I've got something else to show you.

Enjoy,
Bonnie

Monday, January 10, 2011

Featured Stamper meets CAS

I made it back to show you another card I made today. 

Too bad I've written all my Christmas thank you notes.  This would have been perfect!


Yesterday's Featured Stamper on SCS was Julie aka UKjem.  You can see her gallery here.  She has a lovely, elegant style don't you think?

I chose this card as my inspiration.  I flipped the card and used Baja Breeze instead of gold, a different embossing folder & sentiment and rhinestones instead of a pearl.

Today's CAS challenge on SCS is A Day in the Snow.  As luck would have it, we even saw a bit of snow here today.  We had a few flakes and now it's sleeting.

Saturday, we were sitting in a fast food restaurant having lunch and it snowed.  The wind was blowing every which way and the flakes were swirling and dancing so beautifully.  It was like being in a snowglobe.  Wish I could recreate that beauty!

Card Recipe
Stamps:  Because I Care
Ink:  Baja Breeze
Paper:  Whisper White, Baja Breeze
Accessories:  Big Shot, Petals-a-Plenty EF, Snowflakes Sizzlits, Big Shot Multipurpose Adhesive Sheet, Dazzling Diamonds, Basic Rhinestones

Stay warm and enjoy,
Bonnie